FluentCRM Email Campaigns are single email messages sent to all or part of your subscribers. These messages are the heart of your community-building efforts. You can use email campaigns to ensure you send the right message to the right person at the right time.
If you’re new to FluentCRM, please read our FluentCRM Review for a holistic view of the system. Articles like this one delve deeper into specific aspects of FluentCRM.
Video: FluentCRM Email Campaigns
How to Create FluentCRM Email Campaigns
Before you start sending your email campaigns, you need to have a few things prepared.
One of the first elements to consider is the appearance of your emails. How will they look when they arrive in your subscriber’s inbox?
FluentCRM has a few simple email templates you can use out of the box. You can customize them further with email templates to give your emails a signature look.
Alternatively, you can build your emails in an HTML template builder, like Stripo.
I’m actually a fan of simple email designs without a lot of HTML. They seem more personal and they’re less likely to get trapped in a SPAM filter. However, there’s capability to send different kinds of email styles within Fluent CRM email templates.
Customize Your Email Templates

To start creating your Email Templates, choose the Emails dropdown from the top menu of FluentCRM and select the menu option fr Email Templates.
After that, your Email Templates dashboard shows any previously created templates. Click the blue button + Create New Template to customize your new email design.
You’re going to see a form like the one below. I’ve highlighted some important options in red.
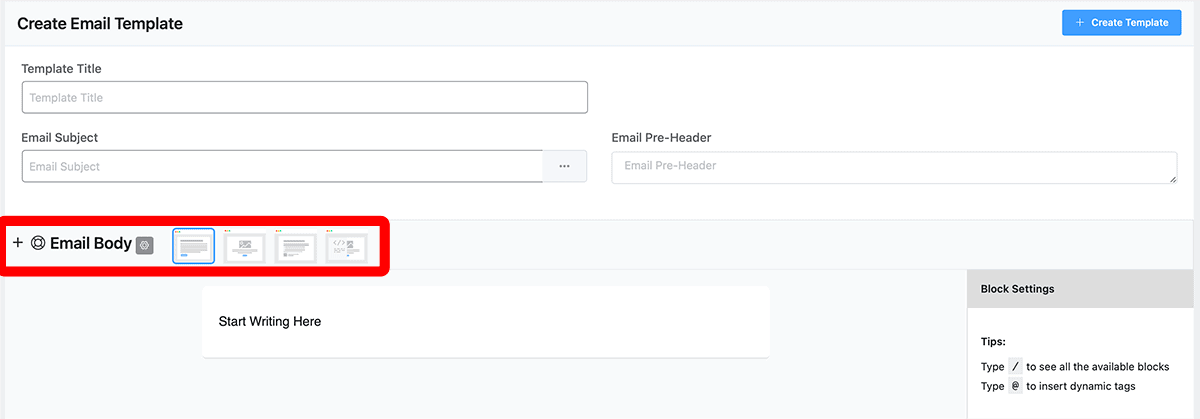
The first field is for internal use. The Template Title helps you organize templates by the purpose. You may have a template for your weekly digest and another for special offers.
Keep in mind that this template is just to get your started. You can change anything in your actual email campaign editor if you decide to change the appearance.
The four square items in the latter part of the red boundary show some of the built-in templates for you to use. You can customize the first three. The last one is to insert HTML that you created in another email builder.
A Template is Just a Place to Start
If you add an Email Subject or Email Pre-header in the template, you can modify them in your actual email campaign.
The same is true of other settings, but the whole idea of a template is to create those settings once and reuse them.
Inside the red boundary shown above, we start with a + symbol. Clicking that symbol shows the Blocks available to you in the editor. You can also type the / key inside the editor to get a list.
Next, you see a Lifesaver icon. Hover over this to see two commands you can use inside of the editor. The / command, as mentioned above, shows you the blocks you can use inside the editor. The @ command brings up a list of Smart Tags you can insert into your body or even in the Subject line.
The Email Styling Settings
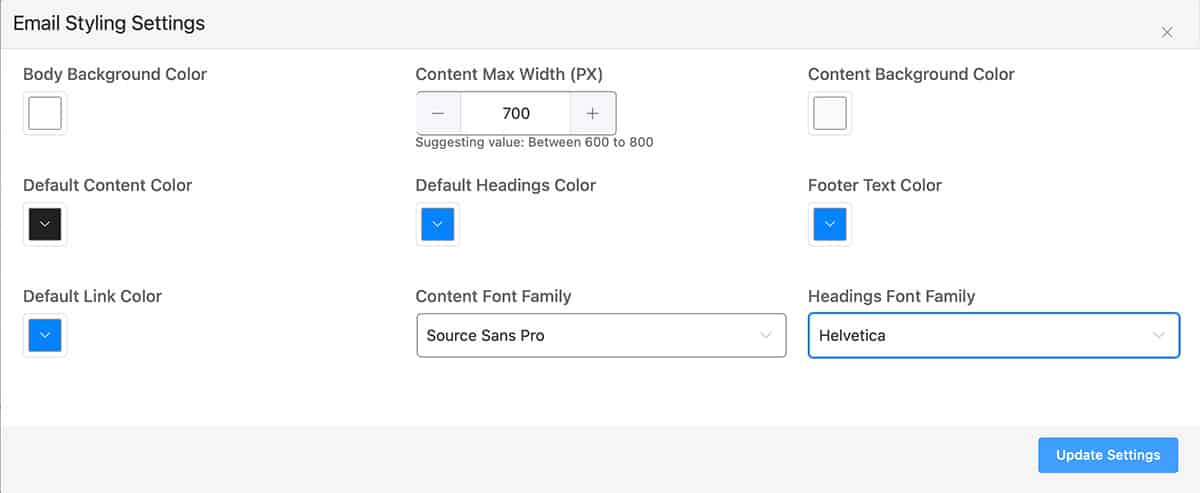
I customized some of the settings in the Email Styling Settings block above. You get this display by clicking the grey Gear icon shown in the previous image, right after the Email Body text.
In this case, I changed some colors to Blue and specified the fonts for Content and headings. I also swapped the colors for Body Background and Content background that came from the first stock template.
You can change these settings to create your own template style.
Customizing the Email Body
If you have standard text or images that you include in every email, you can add that in your template.
Remember, your email footer gets defined in the Email Settings part of FluentCRM. You don’t need to re-create anything in that section.
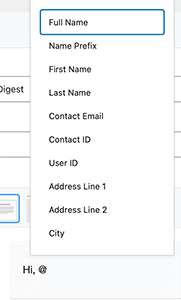
You can enter the Contact Properties, shown here, by typing the @ symbol in your body or subject line.
If you have a standard signature line, that’s something you could include inside of your email template.
Anything you generally or always type manually into your email message is a good candidate to include inside your email template.
Example Email Template
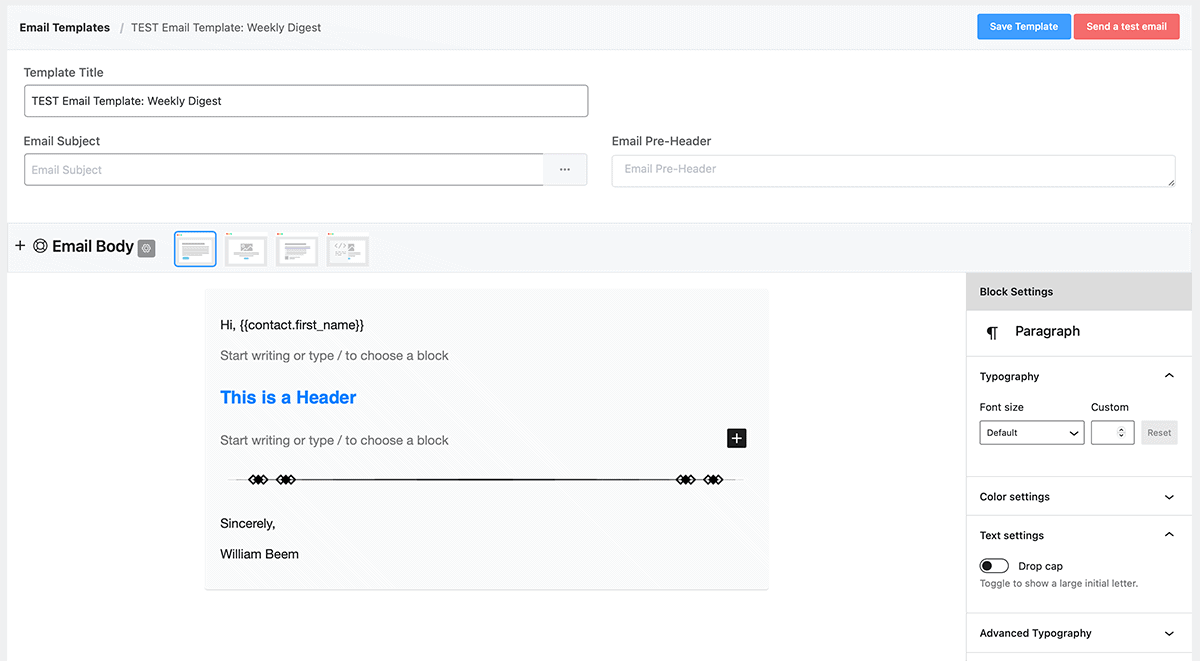
This is a sample of a simple email template. You can see that my first line uses the First Name contact property for a greeting.
I left two blank lines for anything I want to insert into the body. There’s a Header as a placeholder, and you can see that I’ve changed the Header color to Blue.
Finally, my closing is an image file with a divider line and a closing with my name.
Create Subscriber Segments
A key part of sending the right message to the right person is to create subscriber segments. You can learn more about the mechanicals of using Lists, Tags and Dynamic segments in my article on How to Manage FluentCRM Contacts.
The important thing is to understand the reasons for using each of these tools in your segmenting efforts.
FluentCRM automatically identifies subscribers as Leads or Customers, but you need to be specific about the products or services that interest a lead or were sold to a customer.
Ask yourself about the intent if you’re creating an email campaign about your product or service. Is it designed to convert a lead into a customer, or is it to enhance a customer’s experience or interest them in a complimentary item?
There are times that you want to specifically include one group and exclude another group. Why send a sales message to someone who already made a purchase?
You can’t be specific without a good segmentation strategy.
Create a Specific Email Campaign
Now that you have your email templates and segment your audience, you’re ready to start creating your email campaigns.
Remember, these are individual emails that you send to a specific audience. Start by going to the Emails menu on the top row and select All Campaigns.
If you already have some campaigns, they’ll show here. To get started with your first email campaign, click the blue button + Create New Campaign

Give your campaign a title. This is for your internal use. It doesn’t have to be the same as your email subject line.
Composing with the Email Campaign Editor
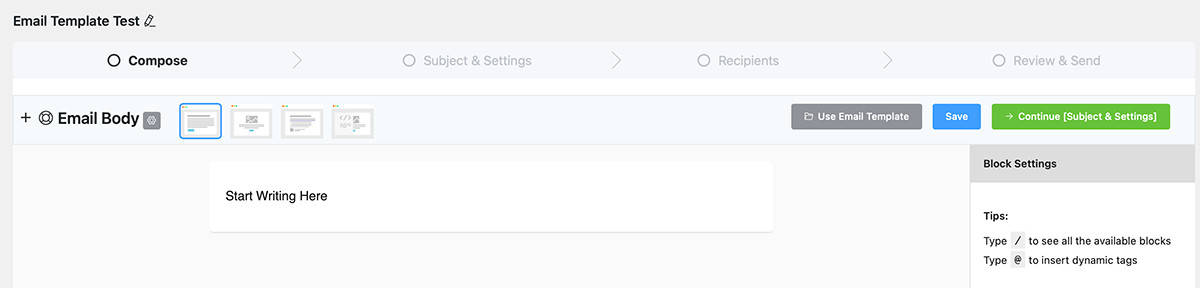
Once you enter your campaign title and click Continue, you’ll see an interface like this one. On the top row, you’ll see four different sections to build and send your email campaign message.
FluentCRM breaks up the different steps, so that allows you to concentrate on one thing at a time. The first thing you may want to do is to click the Grey button to import the email template needed for this campaign.

There’s only one template in the screenshot above, but you may have several. Select the email template you want and click the green Import button.
Once imported, go ahead and add whatever you need to the body for this message. Click the Save button so you don’t lose anything, particularly if you have a long message. When ready, click the Continue button to proceed to the next section for Subject & Settings.
Add Your Subject in Send a Test Email
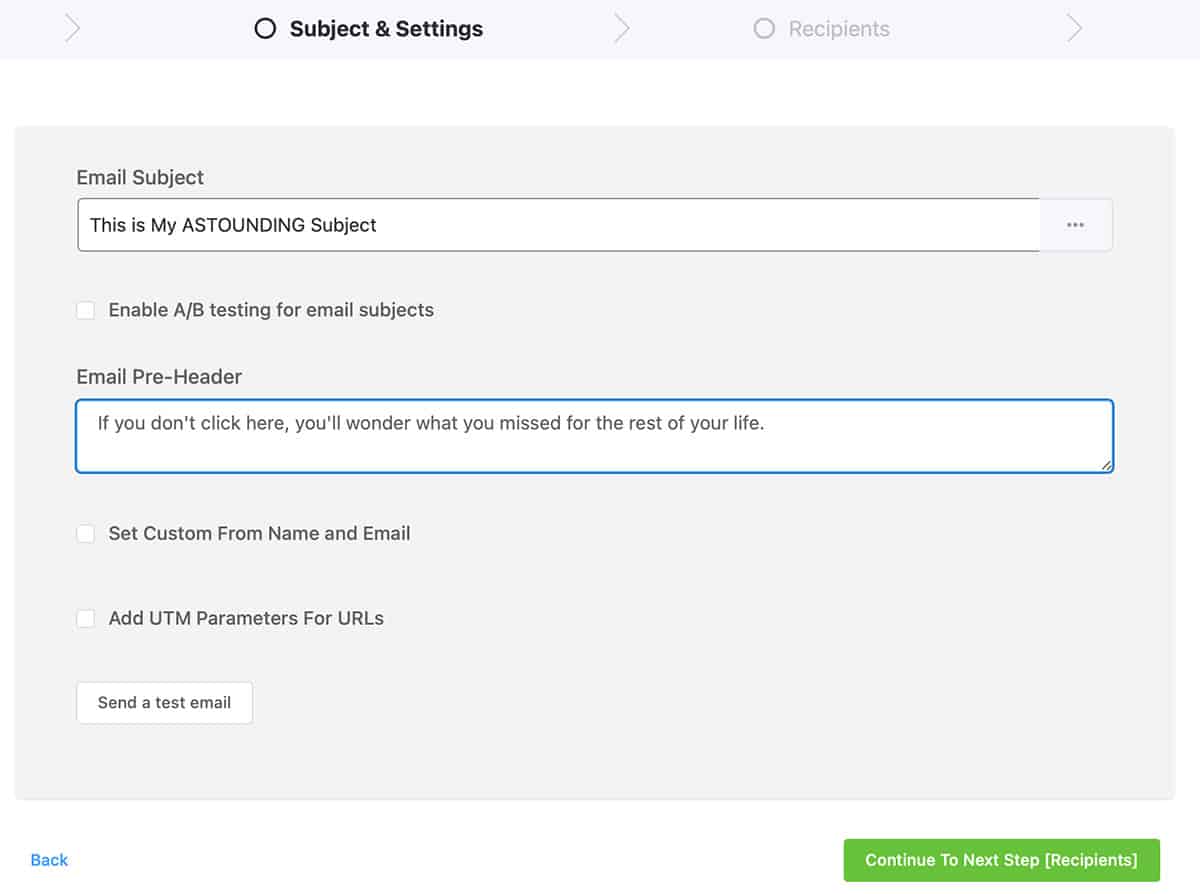
I didn’t add a subject line in my email template, so these fields were blank after import. That’s my preference. If you have a standard email subject or pre-header, you may want to include those in our template.
You can check the box to Set Custom From Name and Email if needed. Once checked, new fields appear to change from your default name and email.
If you check to Ad UTM Parameters For URLS, you’ll get five new fields to complete for those parameters.
Finally, I strongly recommend that you click the button to Send a test email. Make sure it delivers to an email you control. Test the links to be sure they open as you expect. Proof-read your body again. Review any contact property fields to ensure they’re filled out as you expect.
If you didn’t receive your test email, be sure that you configured FluentCRM correctly to send emails through an email service provider. Read our article to configure FluentSMTP to make sure this works correctly.
Once you’ve completed this phase of your email campaign, it’s time to see who gets your email. Click the button to Continue.
Choose Your Email Campaign Recipients
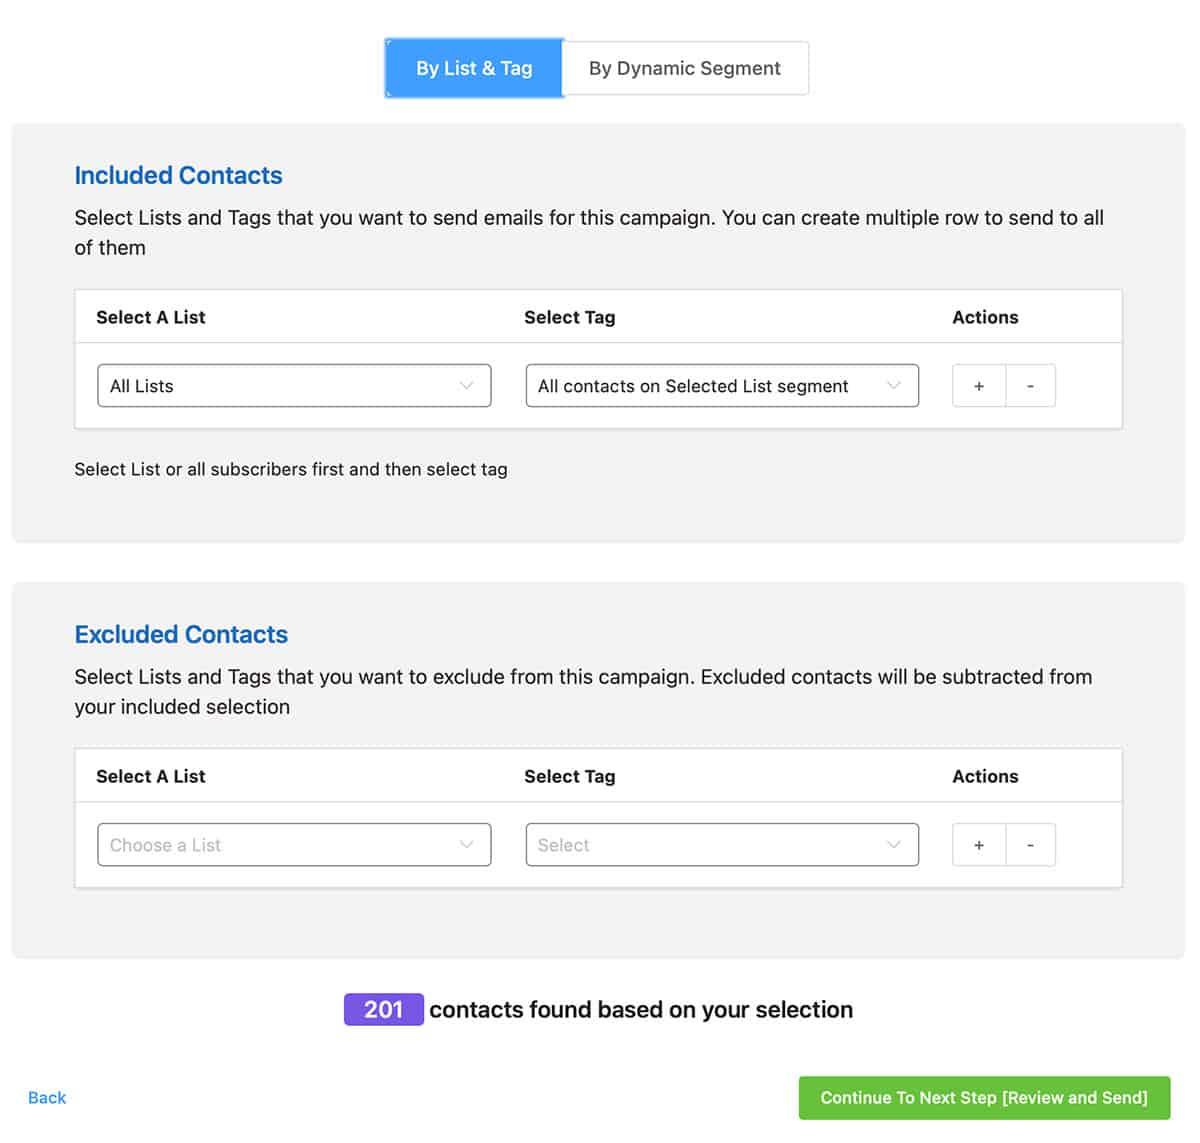
Now you can see why preparing your segmentation is important before sending an email campaign.
At the top of this form, you can choose By List & Tag or By Dynamic Segment. If you choose Dynamic Segment, you get a drop-down list of your existing segments, so it’s very easy to complete.
Otherwise, you can define who to Include and who to Exclude from your email campaign. In most cases, you’ll send to a specific List on the Included Contacts section. You may want to Exclude people who absolutely should NOT receive your email campaign message.
Although you can use tags for either, I don’t recommend using tags this way. You’re likely to have more Tags than Lists or Dynamic Segments and it gets easier to make a mistake and send a message you should’ve sent, or leave out someone who should’ve received it.
Nothing bad will happen if you use Tags, but FluentCRM seems to favor lists and segments for sending emails.
Under the Excluded Contacts section, you see a purple box showing the number of subscribers who will receive your email campaign message. Be sure to inspect this and determine if you’re getting the result you expect.
Next, click the Continue button.
Review and Send Your Email Campaign
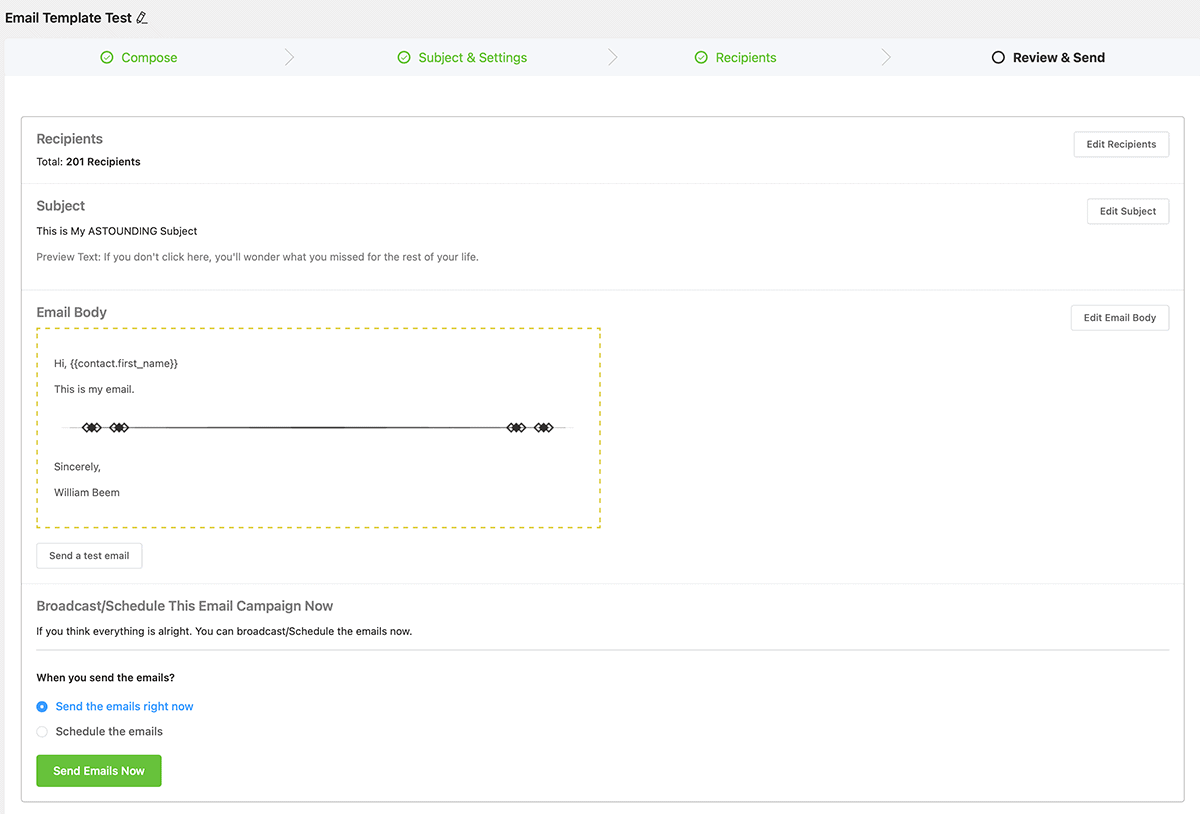
This is the last stage of your email campaign. When you click that green button at the bottom to Send Emails Now, you’re at the point of no return.
It’s very important to review one last time before you click that button.
On the right side, you see buttons to Edit Recipients, Edit Subject and Edit Email Body. You can still make changes. If you aren’t sure of what you see in this view, there is a Send a test email button below the Email Body.
If you’re satisfied, all you have to do now is decide whether to send the emails right away or schedule for the future. If you choose to schedule, you’ll see a time and date option appear.
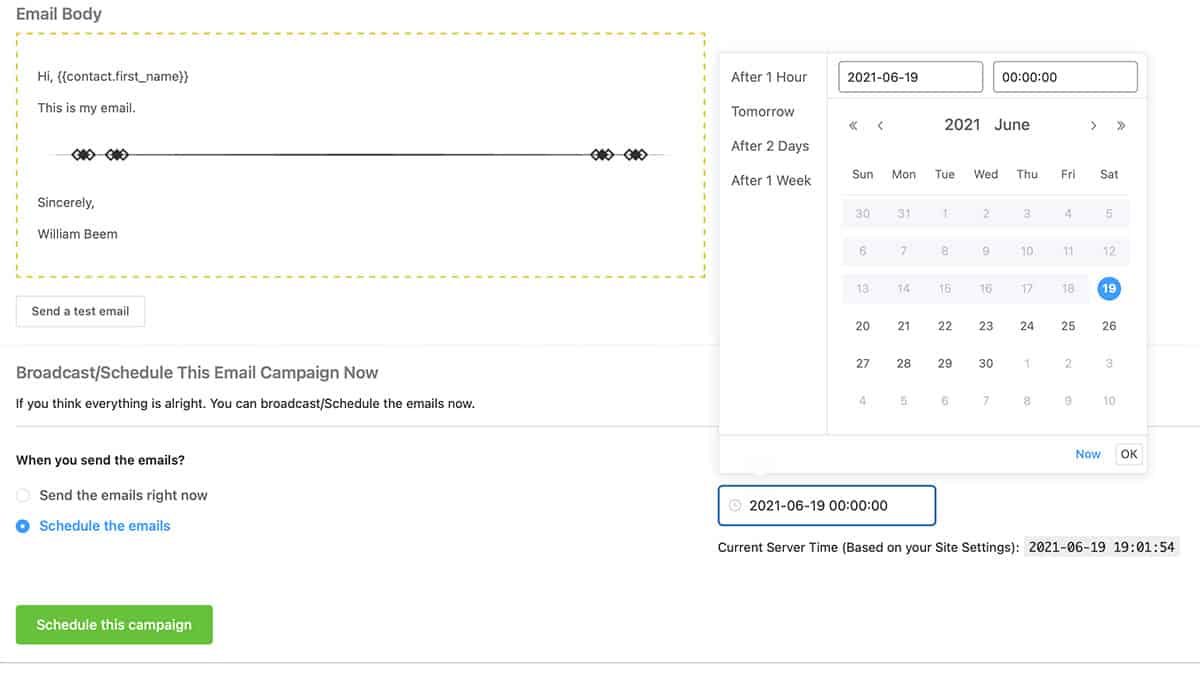
Click in the box on the right side to expand the calendar. Note that there are some presets on the left side for some quick options.
Otherwise, select your date. If you need a specific time, click in the time box on the upper-right to open a time window display. This shows a 24 hour clock where you can select hours, minutes and seconds to schedule your email.
Click the button to Schedule this campaign.
Processing the Emails to Send
Whether your send your emails immediately or schedule them, you’ll see FluentCRM process the recipients for the campaign.
If you send immediately, expect to leave your window open until FluentCRM completes sending all of your emails. The amount of time it takes depends upon a few factors.
If you have a lot of emails to send and you’re on shared hosting, some of your server resources may be in use by a neighbor web site. Dedicated servers can process faster.
If you schedule the emails in the future, you don’t have to wait for this to happen while your browser is open. It just prepares the recipients and sends actions on the server at the right time.
FluentCRM 3.0 is a self-hosted email marketing and CRM solution rebuilt on Vue 3 for 50% faster performance. Native SMS marketing, AI email writing (ChatGPT, Claude, Grok), and deep integration with FluentCart, FluentCommunity, and LearnDash. Enterprise-grade automation and data sovereignty without recurring SaaS fees.
- Vue 3 Infrastructure: 50% faster dashboard, 10X faster bulk sending, maintains 100ms responsiveness with 100k+ contacts.
- Native SMS Marketing: Real campaigns, automations, and two-way conversations via Twilio or Amazon SNS. No third-party glue.
- AI Email Writing: 25 MCP tools integrate ChatGPT, Claude, and Grok directly into the editor for rapid campaign creation.
- Gutenberg-Native Builder: Reusable email blocks and patterns work just like WordPress pages.
- Decoupled SMTP: Separate CRM logic from email delivery (Amazon SES, Postmark, Mailgun) for zero-point-of-failure reliability.
- Fluent Stack Integration: Native connections to FluentCart (commerce), FluentCommunity (engagement), and LearnDash (education).
- Infrastructure Responsibility: Unlike SaaS, you are the Lead Architect. You are responsible for configuring your own Cron jobs and monitoring your SMTP handshake (Managed VPS recommended).
- VPS Requirement: Shared hosting will not perform adequately. A minimum 4 GB RAM / 2 CPU VPS costs ~$30/month, adding to your total cost of ownership.
Not sure which email marketing service provider is right for your business? Check out our email marketing services.
Best Email Marketing Services