Fluent Support Review: Why You Need a Support System for Your Business
When it comes to providing excellent customer service, speed and efficiency are key. Fluent Support is the perfect WordPress plugin for supporting your customers.
With its fully functional support ticketing system, you can create automation to assign tickets based on specific criteria, integrate with chat and messaging services, and get detailed analytics of your support tickets.
Plus, with advanced features like collision detection, you can avoid issues with multiple agents working on the same task. Easily filter and search for tickets and integrate with FluentCRM or other services.
With Fluent Support, you can provide the fast and efficient customer service your clients deserve.
- Low cost of operation
- Multiple integrations
- Automated workflow
- Collision detection for multiple agents working same ticket
- Automatic assignment
- Portal and Email ticket entry
- Custom email notifications
- Performance reports per agent
- It only works in WordPress
- No mobile app
- No SLA support
Video Review of Fluent Support
If you’re interested in Fluent Support – a WordPress based customer support ticketing system – but aren’t sure whether it’s right for your business, read on as we outline some of the top reasons why Fluent Support can benefit your business:
Implementing a support ticketing system is a step toward better customer service and customer satisfaction. Read on to see how Fluent Support can add value to your business.
The Problem Most Small Businesses Have with Customer Support Systems
Every business needs to provide customer support, but it’s often difficult for a small business because you may not have the time or resources to dedicate to expensive ticketing systems, and you may not be trained in the best practices of managing tickets.
If you look at online ticketing systems, they can get very expensive as they charge per seat. That’s a monthly fee for everyone on your team who may need to provide support. That’s just for one site, too!
If you have multiple sites, each with multiple agents who need to use the ticketing system, it’s easy to see how the cost to use an online ticketing system can skyrocket.
Quite simply, the value proposition to use online ticketing systems just isn’t there until your business has substantial growth.
Fortunately, there’s a better solution when using Fluent Support. You pay once per site and can add unlimited tickets and agents without additional cost.
At the time I’m writing this review, Fluent Support is available only on a Lifetime Deal. That means you pay once and never pay again, but you get all future updates to the product. At $99 for a single site license (there are other plans that include more sites), it’s a steal compared to anything else on the market.
The Major Benefits of a Customer Support Ticketing System
There are several benefits to using a tool like Fluent Support. Among them:
Customer service issues may be time-consuming and repetitive. Fluent Support reduces the time to resolution with automation and saved replies. Implementing a support portal and email service provides a conduit to communicate with your customers. Ultimately, using Fluent Support allows you to provide higher-quality support.
Those benefits lead to higher customer satisfaction, which in turn means they’re more likely to do business with you again and also recommend your business to others. Many people think of a service desk as a cost center, but smart businesses know that high-quality customer service helps drive revenue.
If you’re in business and have no experience with customer support ticketing systems, don’t worry. Check out this article to get started.
A Look at the Customer Experience in Fluent Support
Providing a support system that’s easy to use is part of the overall customer support experience. Fluent Support does a great job of providing an intuitive user interface for your customers. Let’s take a look at the different parts of the web portal experience.
Logging in to the Support Portal
When a customer visits your page with the support portal, you have a login page option provided with Fluent Support that looks somewhat like this image:
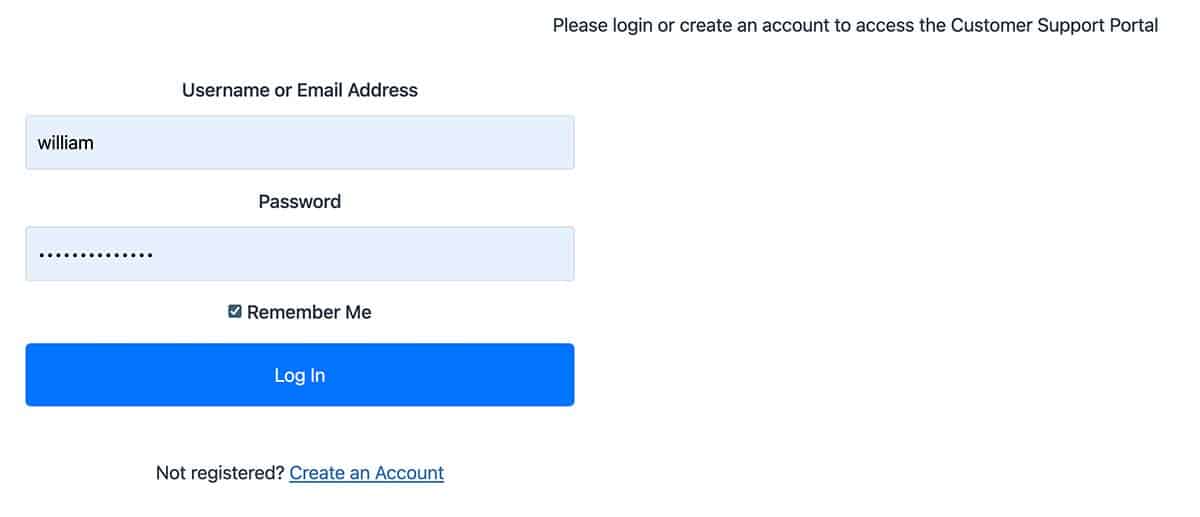
Fluent Support provides shortcodes that you can embed in your WordPress page for the support portal. In order to use the web portal, you must have a registered account. If this is the user’s first time, notice there’s a link below to create an account.
The shortcode provided only adds the form you see on the right. The text encouraging a visitor to log in or create an account is something you can create inside of WordPress. Using the block editor, you can create any additional message or styling that you like.
Since this form is merely a login form for your customers, you may not need it if you already have a different way for your customers to log in to your system. Fluent Support provides this method for those who don’t have another login.
After logging into the system, you just need to redirect the user to your support portal page. On that page, the customer sees a dashboard, like the one below.

New customers receive a message like this one if they don’t have any support tickets. For those who already have tickets, they see a list of them here and can click to enter a given ticket.
How a Customer can Submit a Support Ticket
In this case, the user clicks the green button to Create a New Ticket and gets the form shown below:
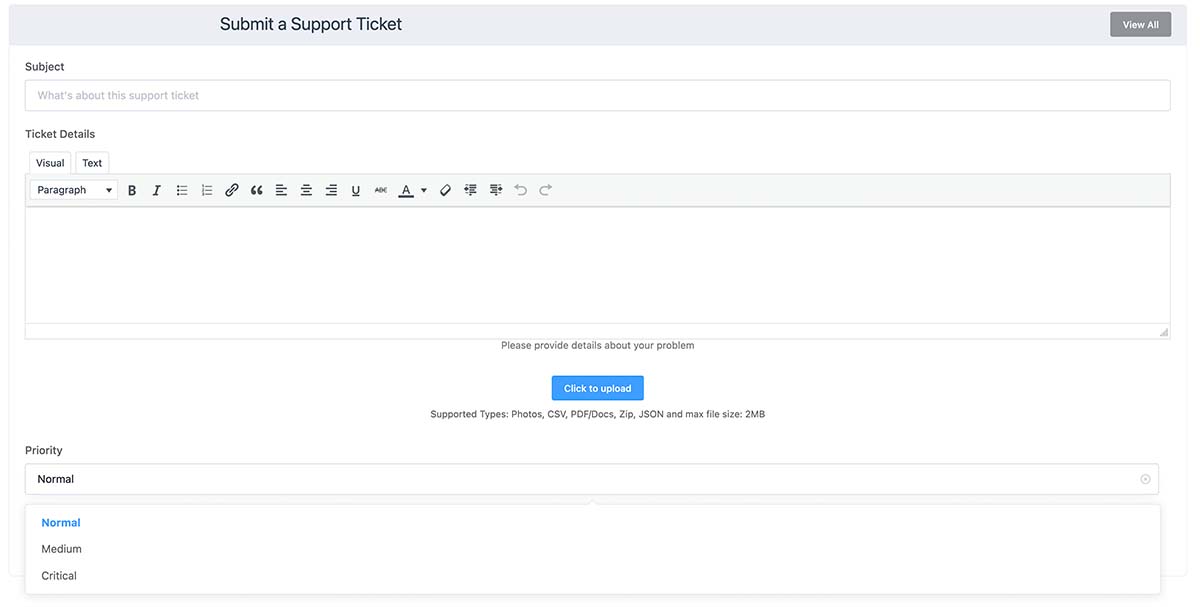
Once the form appears, there are only four fields that the customer can enter:
How Customers View Their Tickets
After entering the details of a ticket, a quick refresh of the dashboard looks like this:

Clicking on a ticket opens the conversation history. At any time, the customer may add more notes to the conversation and history of the ticket. If there is a response from a support agent, that shows in the history. The user may also Close a ticket. If needed, the user may reopen a closed ticket.
When the customer opens a ticket in their dashboard, they see the following view:

The ticket display shows the conversation history from the customer and agent. The status of the ticket shows on the top line that it’s now Active.
The customer may write another reply, click the Refresh button, go back to a view of All tickets, or Close the ticket using the red button.
How a Support Agent Views Tickets
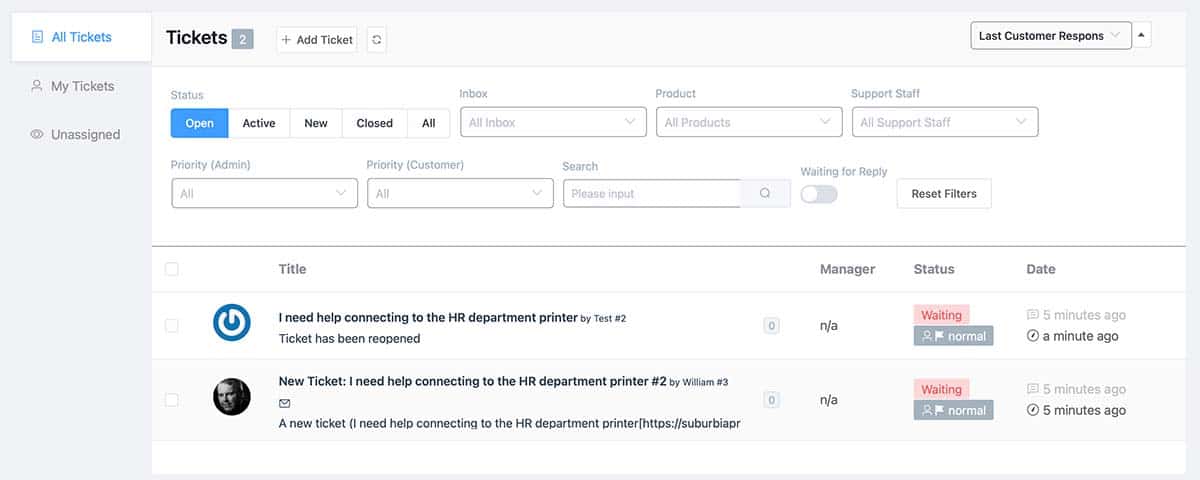
This is the view an agent sees when working tickets. As you can see, there are many options to sort and display tickets. There is a Status field with color codes to help an agent quickly determine the tickets that are waiting for a response.
On the left side, you see a column with three options:
Along the top row, we see a count of tickets in the queue. Next, there’s a button to Add Ticket if the agent needs to create a ticket (useful for phone support). The next field is a button to refresh entries in the queue.
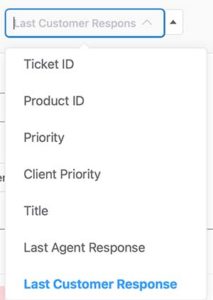
The last field is a dropdown box to select how to sort the tickets in the queue. The sorting options are:
You may notice that there are two priority fields listed here. As we saw when the customer opens a new ticket, they have the option to select a priority for the ticket.
How to Filter the Ticket Queue
However, the agents have a similar priority field. The agent’s value of priority may differ from the customer’s entry. That’s based upon other factors that the customer may not have knowledge about. Both fields are helpful to determine how agents prioritize their work.
Let’s take a look at the filters in the next section.

At first, some of these options may seem a bit confusing. I’ll explain in reverse order of the display.
After the Status buttons, we have three dropdown boxes – Inbox, Product, Support Staff. Here’s what they show.
The next line shows the Priority fields, both for the Admin team or the Customer. A search field allows a text search for information inside of a ticket. The Waiting for Reply toggle shows tickets specifically listing those where a customer is waiting for a reply.
Finally, the Reset Filters button clears all of these filters so you have an unfiltered view of the tickets in your queue. Search filters remain persistent until you elect to reset the filters.
Next, we’ll look at the ticket queue.
Working with the Fluent Support Ticket Queue

Now let’s click on a ticket and show the other side of the conversation and user interface.
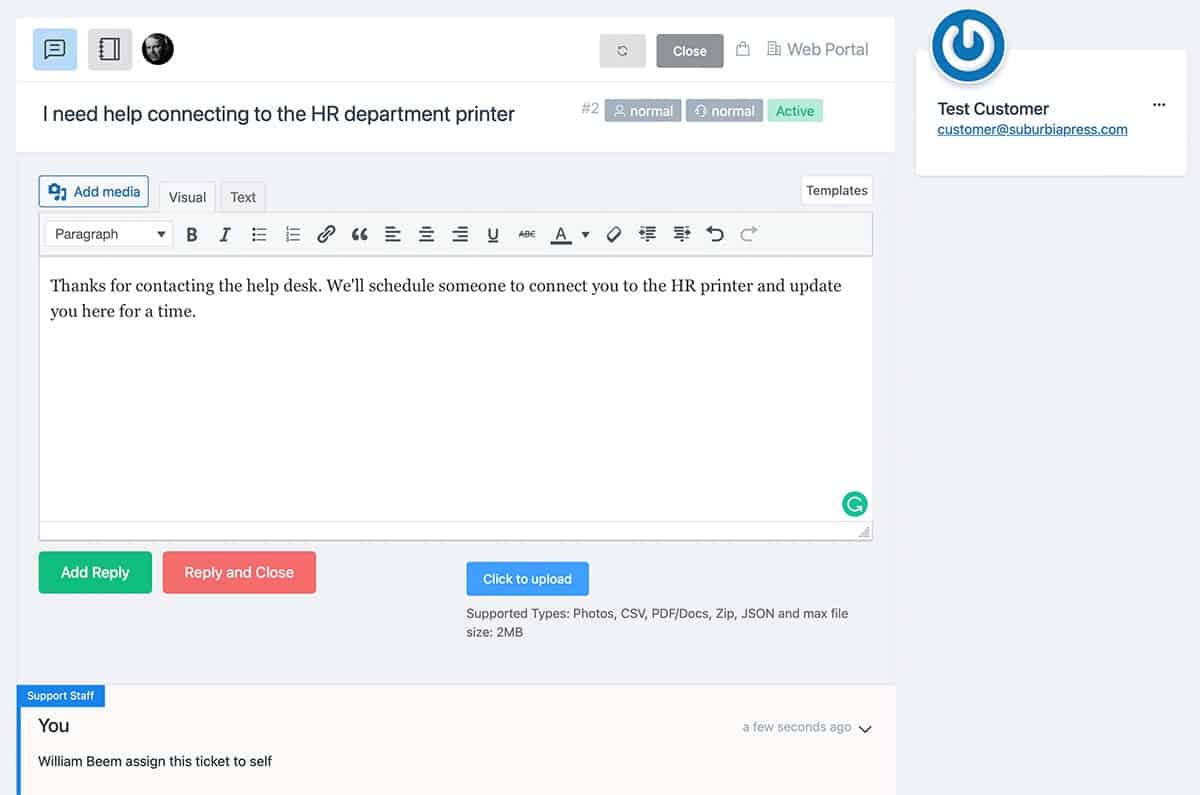
There are three icons on the top left. Clicking the first one opens the conversation with the customer. You can see the text area below where the agent writes a reply to the request.
The next icon opens a similar text box, but this is for internal notes that the customer doesn’t see. The area surrounding the text input area changes to a yellow color to alert the agent that this is for Internal notes. The final button is where you assign the ticket manually. Once assigned, as it is here, it shows the avatar of the assigned agent.
There’s one more button that isn’t shown here but will appear if you create Manual Workflows. It looks like a cloud icon. A workflow is a series of steps that can trigger. Manual workflows require an agent to select them here to initiate. Automatic workflows trigger based upon criteria, such as who submitted the ticket or text criteria specified in the ticket.
On the right side, we see another refresh button and a close button. Next to that is a button for Saved Replies. If you have common responses, you can add them as Saved Replies in Fluent Support and then insert them from a dropdown list using this button.
On the far right, you see basic information with the customer’s avatar, name, and email address. When you integrate Fluent Support with other tools, you get more information when your customer is active in those tools.
More Data from Fluent Support Integrations with Other Tools
If you use WooCommerce and the customer made a purchase, you’ll see that info below the initial block. For customers in your FluentCRM list, you’ll see if they’re subscribed and what tags are applied to them. You could even apply another FluentCRM tag from that block. If they’re enrolled in a LearnDash course, you’ll see info about their courses and activities.
Fluent Support currently integrates with these tools, and more integrations are forthcoming:
Creating Workflows to Automate Fluent Support
Workflows are a series of actions that can speed up the processing of tickets. You can have Manual Workflows, which only run when an agent selects a workflow. Alternatively, Automated Workflows occur based upon a selection of criteria that runs the workflow when there’s a match.

To get started, select Workflows from the menu option to visit this dashboard. Click the blue button to add a new Workflow.
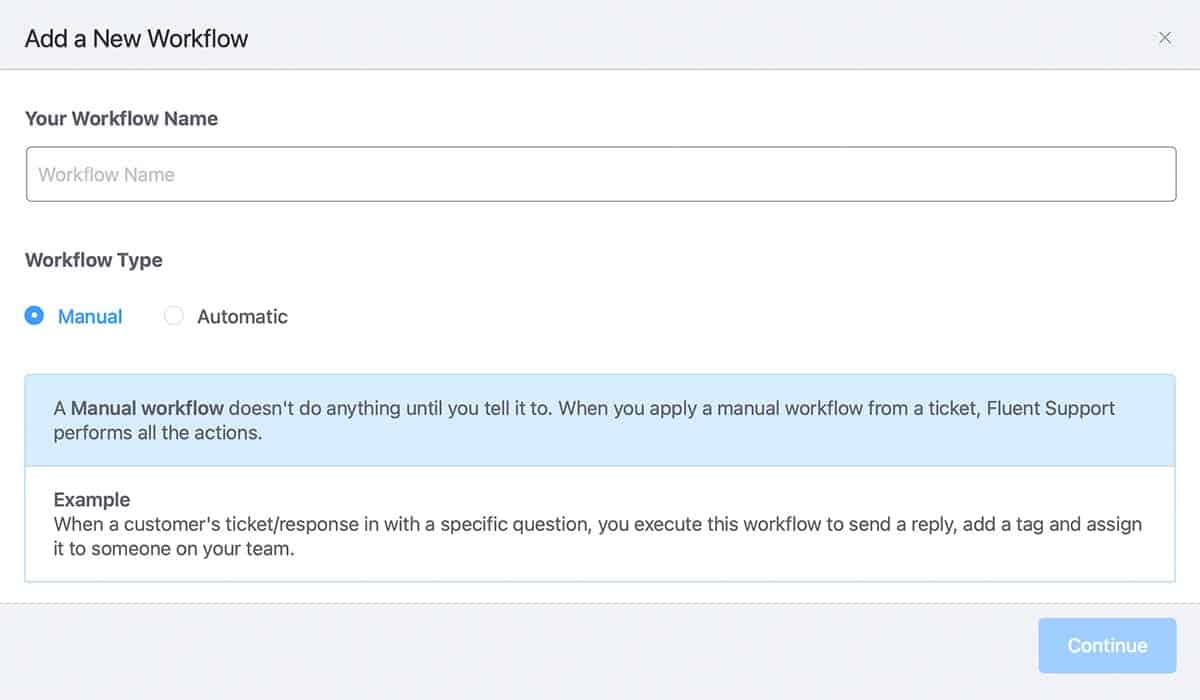
Enter a name for your Workflow, and then decide if you want the trigger to be Manual or Automatic. A brief description of each option appears below to help you decide. The only real difference is selecting trigger criteria in the Automatic Workflow. The actions, which you can stack together to do more than one task at a time, are the same.
Let’s look at a workflow to automatically assign a ticket.
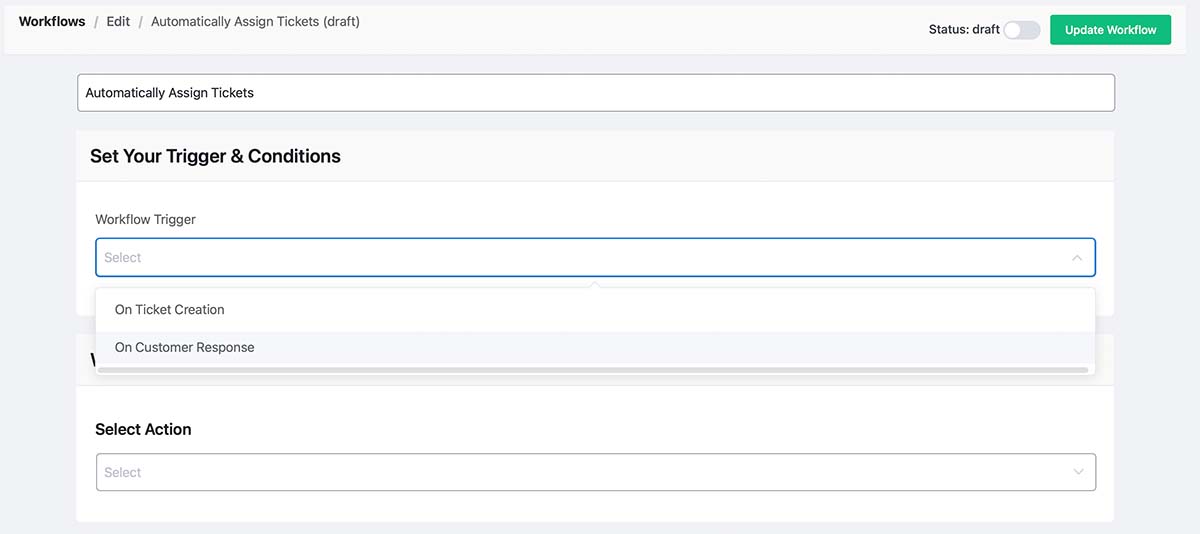
Currently, there are only two triggers for an Automated Workflow:
I truly hope that Fluent Support will have more options in the future. It would be useful to create actions based upon ticket classification and priority, perhaps to send alerts or notifications. For now, we’ll select the first option.
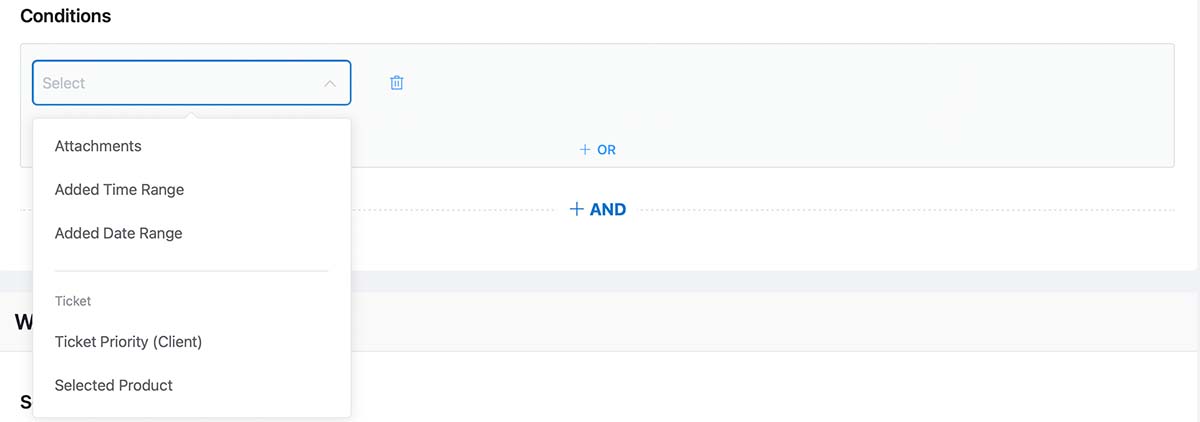
There are more conditions than the dropdown can display, so I’ll list the current options below. Notice that you can use And/Or logic to specify your trigger criteria to automate an action.
Before we continue with the process to assign the ticket, think about what you can do with these options. Using the Added Time Range, you could specify a notification to users if they submit a ticket outside of your business hours and let them know when to expect someone to review their issue.
Another option is to provide a VIP response based upon the user’s name or email address. Some products may get assigned to different support agents.
Keep in mind that the Selected Product doesn’t have to be something you sell. If you’re working on an internal support desk, you may want to use a Department Name as a Product to help categorize the support you provide.
I would love to see the inclusion of Tags used here, so we could choose a Tag as criteria to use in an Automatic Workflow.
For a site that I work by myself, I created a Product called All Tickets.
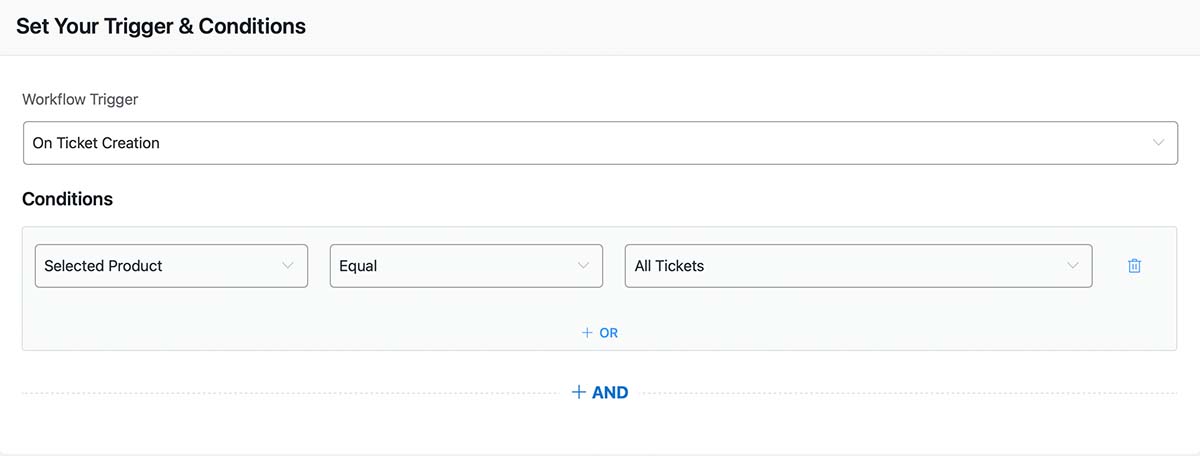
I don’t need to add any AND/OR conditions, so now we’ll proceed to the actions.

The first step is to choose an action. You can stack multiple actions, but you must build them one at a time. The list of actions currently includes:
My first option is to assign all tickets to myself, like this:
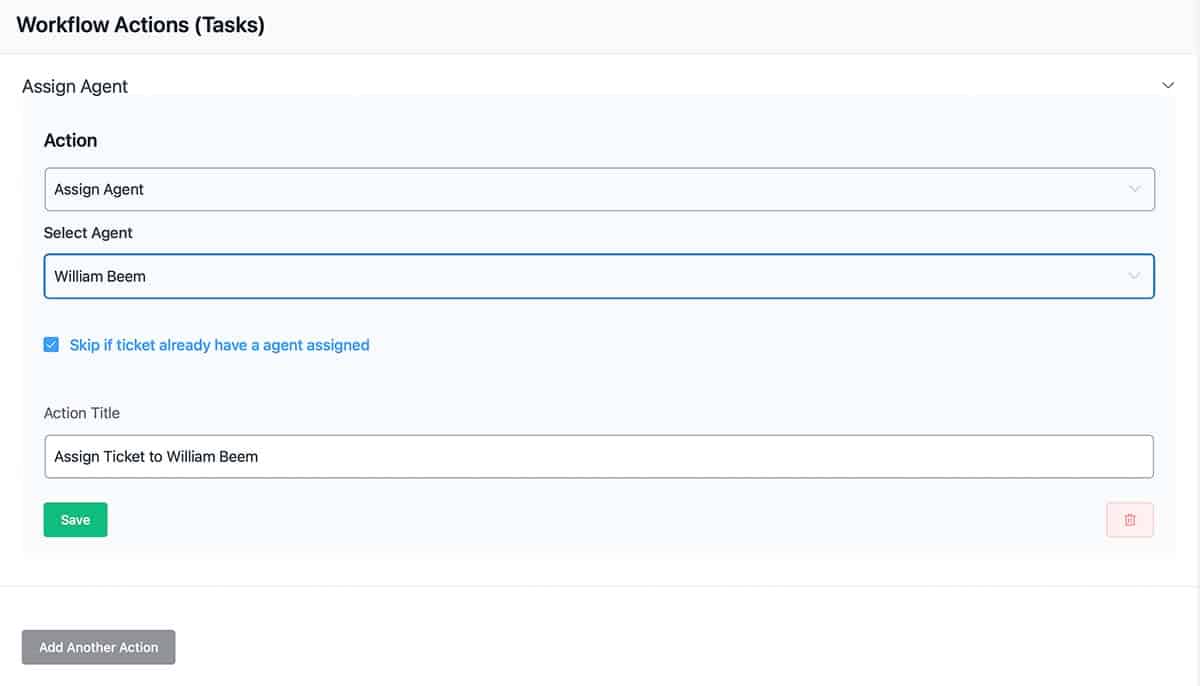
The Select Agent shows a dropdown list of agents in the system, plus Unassigned. The checkbox to skip if the ticket already has an agent assigned is useful. Then you just provide a title for the Action to describe it and click Save. If you don’t like or need the action anymore, click the trashcan icon on the lower right.
Now let’s add another action.
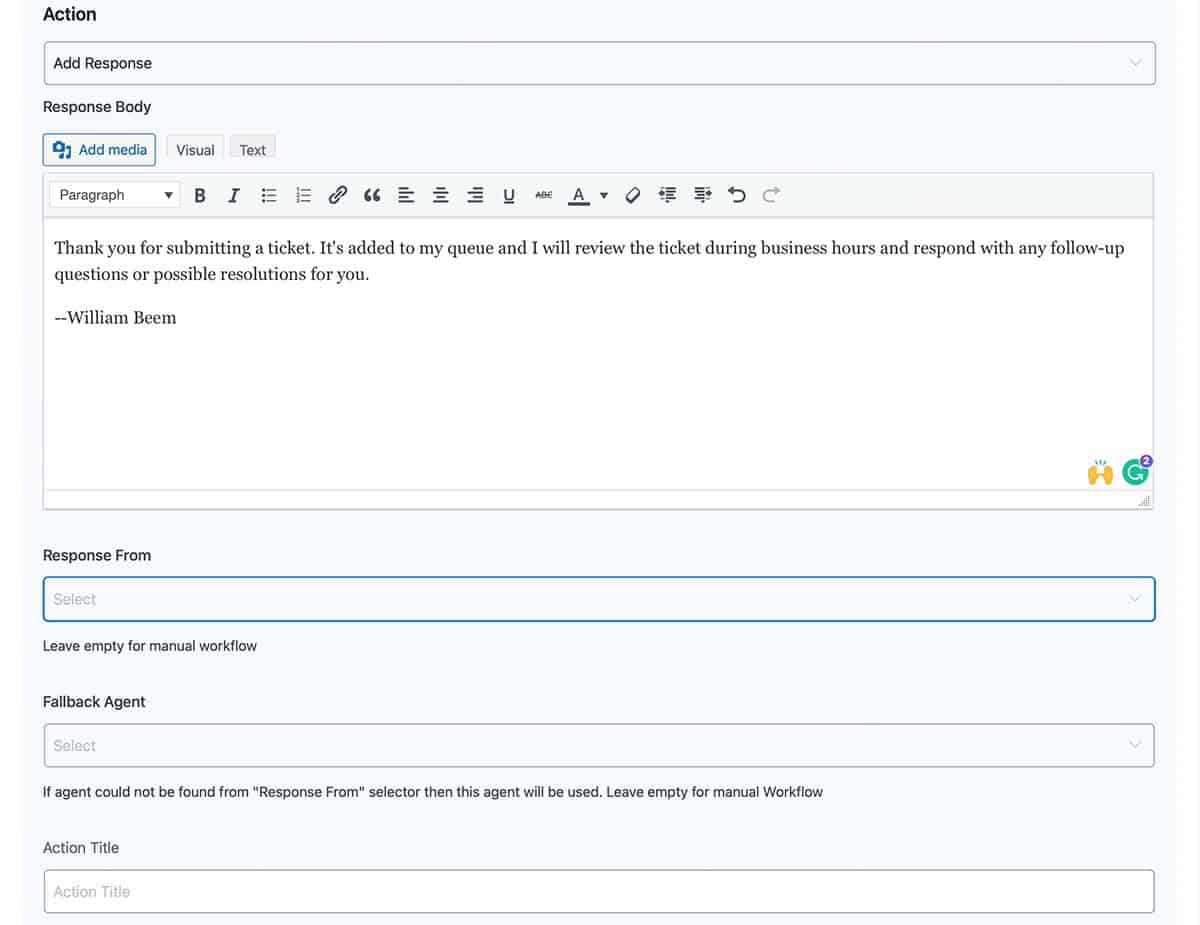
I think this option shows how well-thought-out Fluent Support is for customer service. You’d expect a text box that allows me to create my reply. However, the next two fields really show potential.
The Response From field could be from:
Customer support tickets may have different agents working on them, so this gives you options to send from different agents.
The Fallback Agent lets you specify another agent to handle things if the primary agent is out or unavailable.
There’s another field to name the Action and save it, just as we saw with the first one. I won’t go through all of the possibilities with different actions, but you can see that Fluent Support has the benefit of experience in handling tickets from the vendor who created it for internal use.
When you complete your actions, be sure to toggle the workflow from Draft to Published to enable it. You can find that toggle at the top of the Workflow builder. The Workflow Dashboard will show the status of a workflow as Draft or Published.
How to Configure Fluent Support for Your Business
Fluent Support has two major areas where you can configure your support system on the back end. The first is Global Settings and the other is Business Inboxes.
We’ll take a look at each of them in turn.
Fluent Support Global Settings
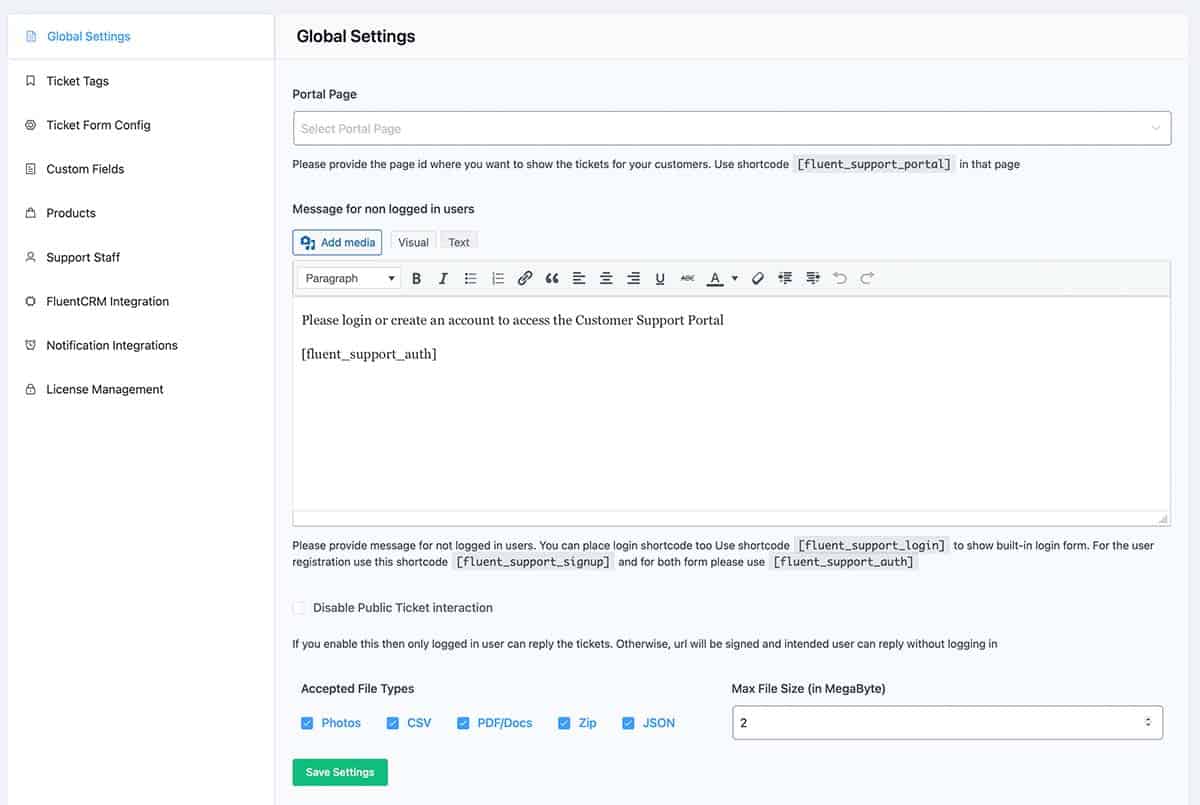
There’s a vertical menu to the left of the screen. We’ll review the different sections here starting with the Global Settings option. The first field is to select the Page that contains your Support Portal. By default, Fluent Support will give you the option to create a page called Support Portal when you initially install the plugin and go through the startup wizard.
However, you can select any page you wish and place it in this field. The actual details of the support portal come from a shortcode. There are several listed in this section to allow the display of the portal, with the default of [fluent_support_portal].
The next field is text to display to users who are not logged in to WordPress if they visit your support portal page. You can use any of the shortcodes underneath the text box to display a login form, a signup form, or the latter shortcode of [fluent_support_auth] gives both a login form and a link to create an account in the same display.
If you have an alternative solution in place for customers to log in or signup, those work just fine. Fluent Support includes these shortcodes for sites that don’t have other login systems, but it’s not required to use these login or signup forms. Only the [fluent_support_portal] is mandatory to display the page to users who are already signed into their account.
Under the text field, there’s a checkbox if you want to limit your ticket interface only to those who are logged in as WordPress users.
The final row displays which file types you permit a user to upload with a ticket, and the maximum file size of an attachment.
Creating Ticket Tags

Ticket Tags are a way to add your own metadata to a ticket. In the screenshot above, I added tags for the types of tickets that I’ll use, but you can put anything you like into a ticket.
Using these examples, I can classify a ticket as an Incident (most common), a Problem (which I use to investigate multiple incidents), or a Change (when I need to make a configuration change to a product, service, course, or even the website).
Another common type of ticket is a Request. Those are tickets for users who don’t have a service degradation or failure, but rather want to ask for something to happen.
Ticket Form Config
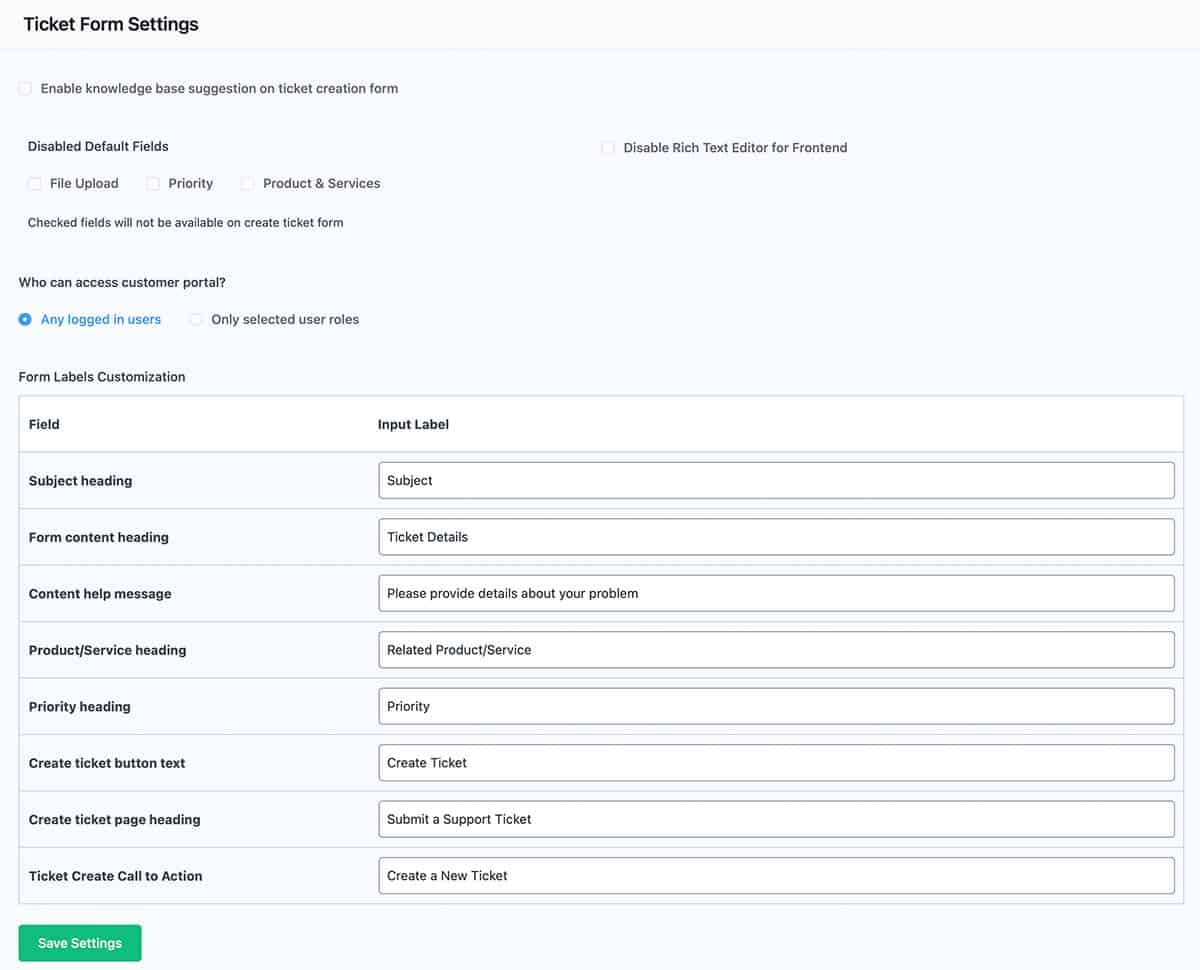
This is a long form, so we’ll cover it line by line.
The first line is a checkbox to integrate knowledge base suggestions upon ticket creation. This is a wonderful way to permit self-service with knowledge base articles before someone submits a ticket. Click this checkbox and a new display opens below it.

When you check the box, you can select different types to integrate your Knowledge Base articles. Some 3rd party tools for those articles use custom post types, which is how I have the option to select the docs type.
I use a tool called BetterDocs to manage knowledge base articles on my various websites. When installed, it creates the “docs” custom post type that integrates with Fluent Support by merely checking this box.
Finally, you can set a limit to how many recommended articles appear as the customer types their Subject/Title for a new ticket. If the user finds a good match. they can click the article to read and it may help them resolve the issue without entering a ticket for your support agents to work.
The next section allows you to disable fields that you don’t want your users to have available when they create a ticket. Check these boxes to prevent them from having an option to upload attachments, set a priority, or select products/services (which we’ll review below). There’s also a checkbox to disable the rich text editor, leaving them with a plain text box to submit tickets.
Is your support portal available to any WordPress user, or only selected roles? Check the option you wish. If you go for the selected roles, you’ll see a bunch of checkbox fields for each user type on your site. Check the ones who you want to have the ability to submit tickets.
Finally, you have the option to change the labels for buttons and fields in your support environment. This may come in handy for different languages or just using an alternative description.
Using Custom Ticket Fields
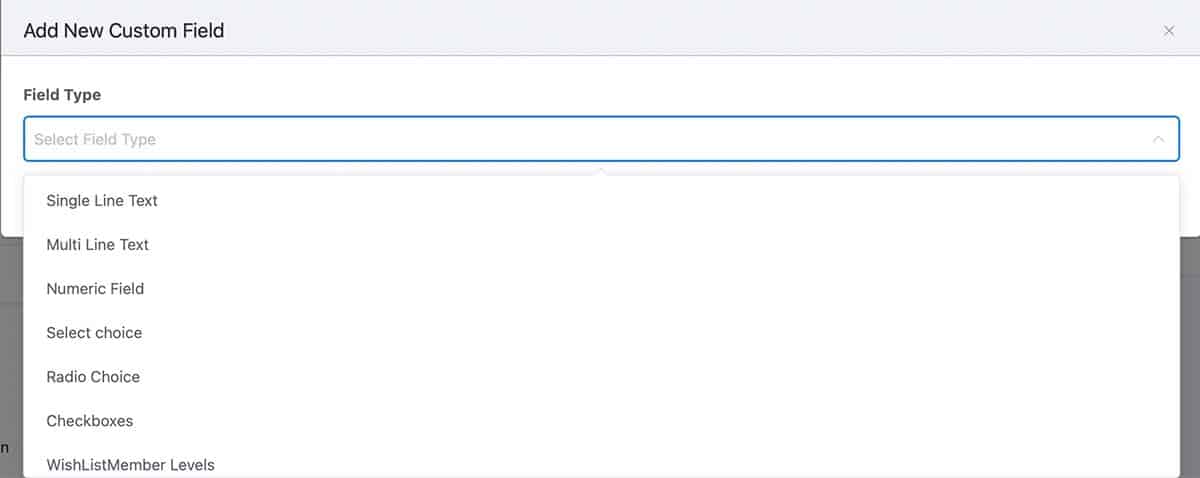
When we discussed Tags earlier in the review, I used an example of including tags to classify the ticket type. That’s one way to do it.
Another way is to use a Custom Ticket Field. I could use a Select choice field type or perhaps a Radio Choice field. Here’s a look at how I would create the Classification custom ticket field using the Select Choice option.
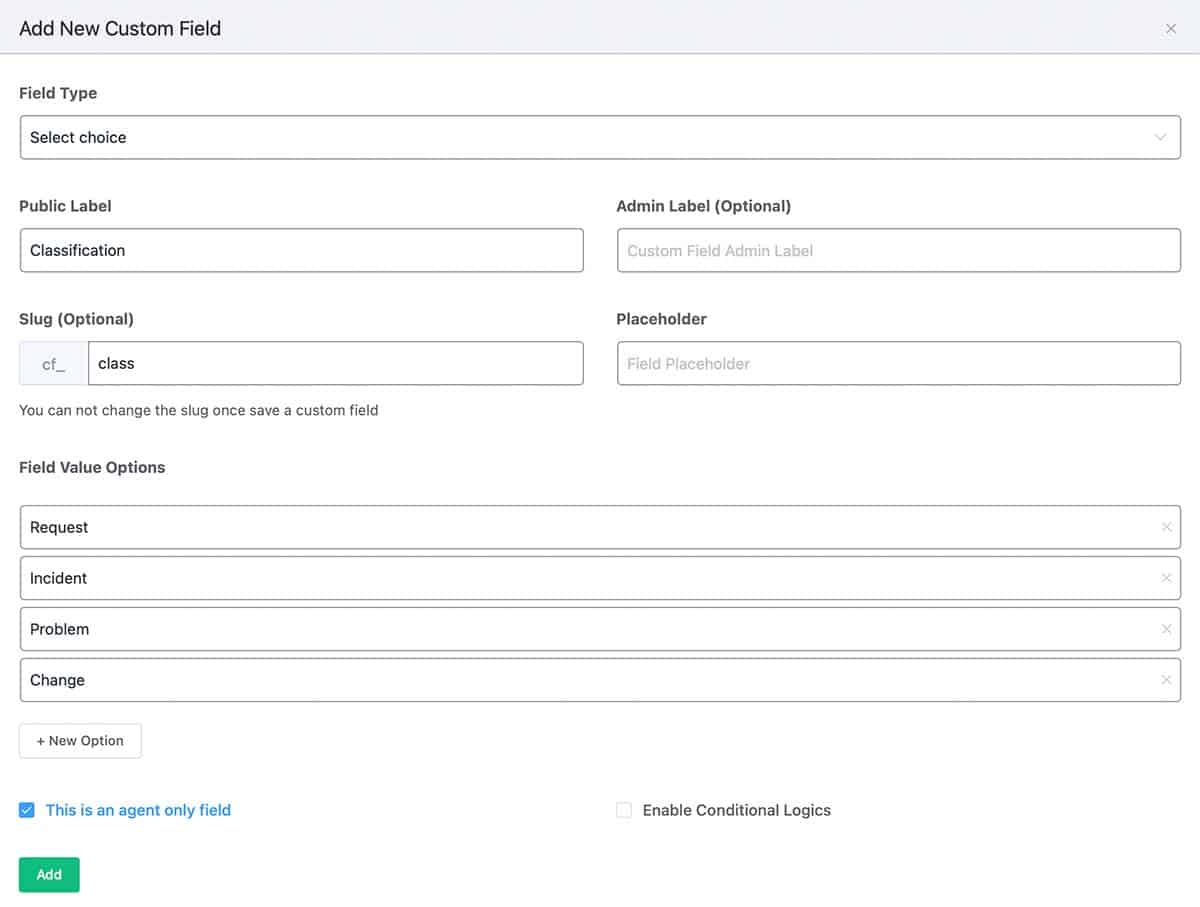
After completing this form, a new dropdown field shows on the ticket creation form. Notice the checkbox at the bottom. You can hide this from your customers and allow the agent to use this field if it’s for internal use.
The next checkbox is to enable conditional login, and I’m not going to explore it here. Suffice it to say there’s a lot of power at your fingertips when you combine custom fields and conditional logic.
Creating Products (Categories)

Adding a Product is just a way of associating a ticket to a product or service. You could also create a product that is a category, a department, or whatever descriptive item you want.
You may recall that I created a Product called All Tickets when I showed how to automatically assign tickets. If you have support agents in a specialized field, you could do the same thing. Create a product with their specialty and have tickets automatically assigned to a specific agent.
Products also help in reports where you may want to see which type of ticket is consuming your time and effort, or most misunderstood by your customers.
Adding Support Staff to Fluent Support

You can start adding your agents in this field by clicking the blue button. You’ll see a form to record their name, title, and email address. Another nice feature is the ability to limit an agent’s roles within Fluent Support.
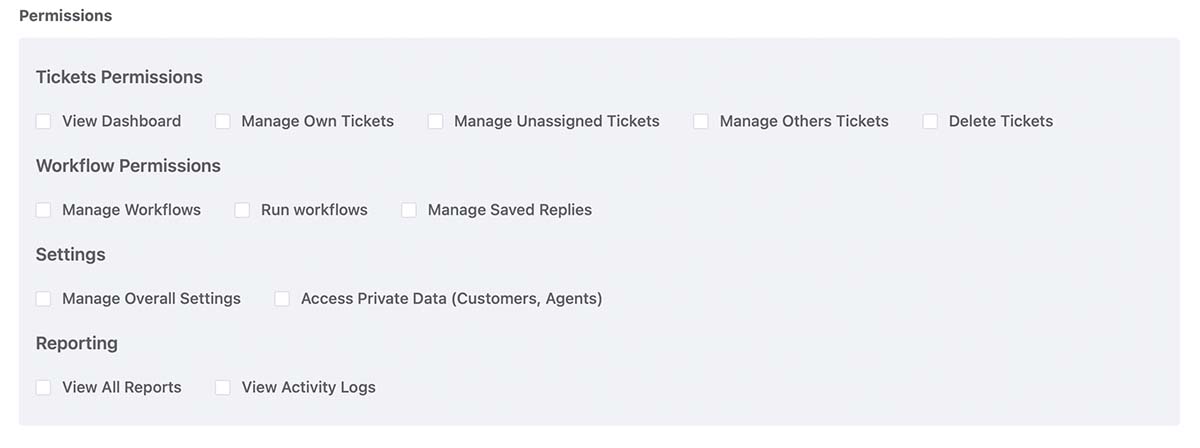
For each support staff record, you can determine the permissions or access you want to grant. Some staff may require complete access, yet others don’t need to manage settings or reporting. You decide who gets the permissions they need to do their job.
That’s an excellent security feature. Never grant permission in excess of a user’s needs for their role.
Integration with FluentCRM
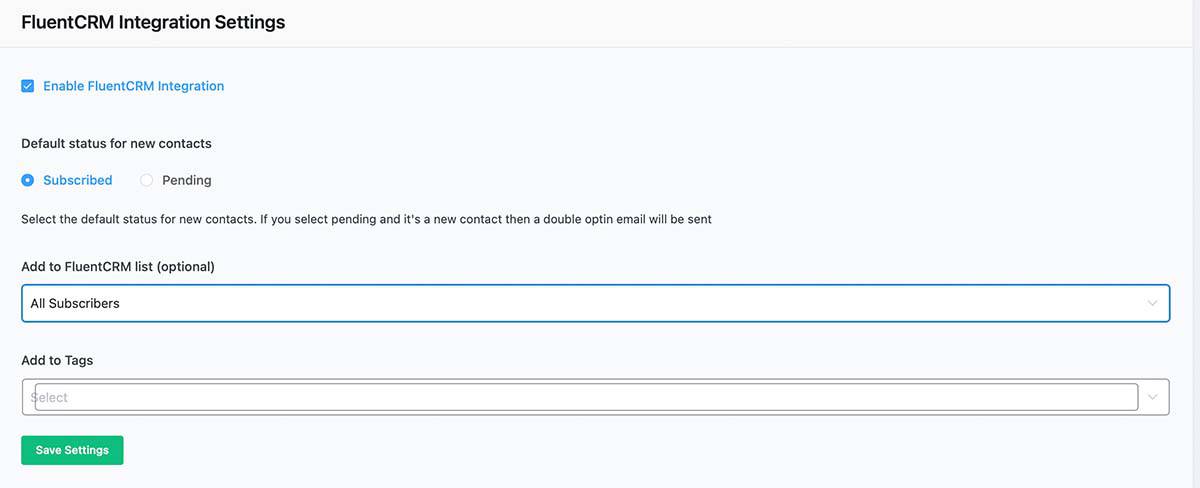
When you have a wonderful compaction application like FluentCRM, you need to make it easy to integrate. At first glance, you only see the checkbox to Enable FluentCRM Integration.
Once you check that box, the form opens to display the rest of these fields.
The default status depends upon whether you want the user to confirm their email address. Subscribed adds them to your FluentCRM system without confirmation. Pending instructs FluentCRM to send an email to the user’s address and they must click a link in the email to confirm before they’re able to receive additional messages you send from FluentCRM.
Within FluentCRM, you can have Lists and Tags. Adding a user to a list with this integration is Optional. Adding a tag is mandatory. You must add at least one tag to a user. You can add more, but you must have at least one tag here.
Integration with Notification Systems
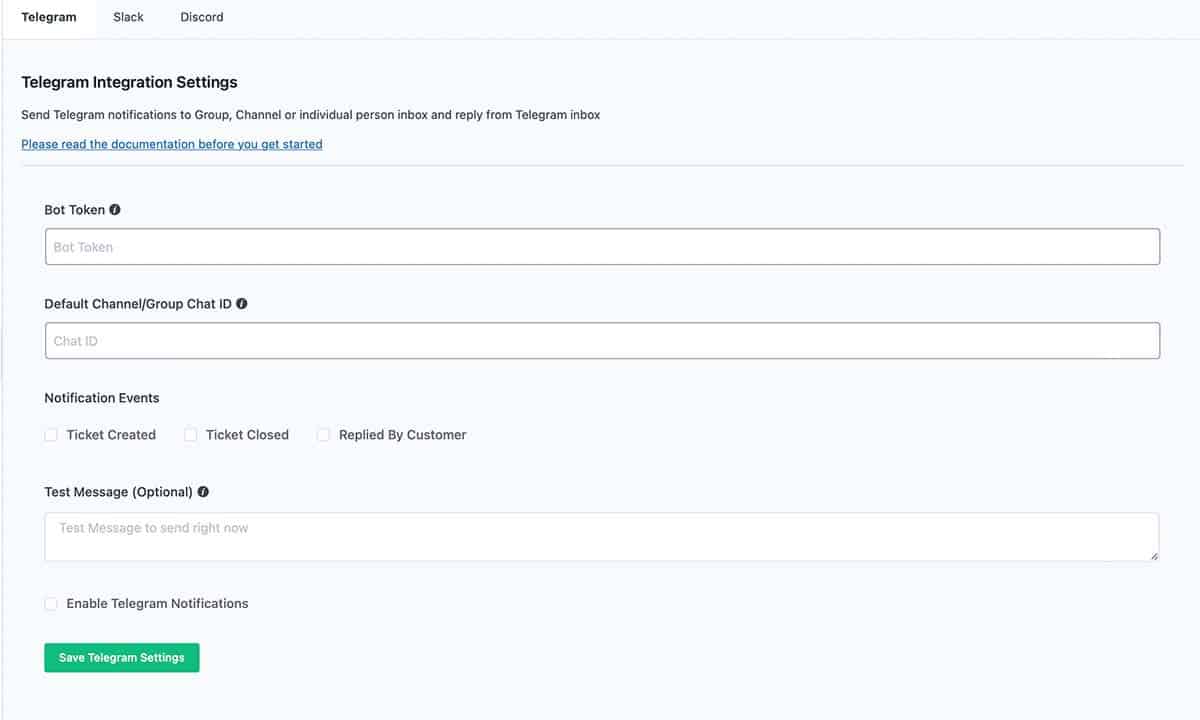
One of the most useful things you can do with a support system is to send notices and alerts. I use a Slack channel to get alerts when I make a sale or someone abandons a cart. Now I can add Fluent Support to my notices.
Telegram, Slack, and Discord are the current options for notifications. You can see that Telegram has three notification events. Discord shows the same three events. Slack seems to be a bit different. You can enable Slack notifications, but Fluent Support doesn’t have checkboxes for specific notification events with Slack. Instead, you can subscribe to different bot events within Slack.
It seems that only Slack allows an agent to reply to a ticket from within that tool, where I don’t see an option to reply in Telegram or Discord.
Fluent Support Reports
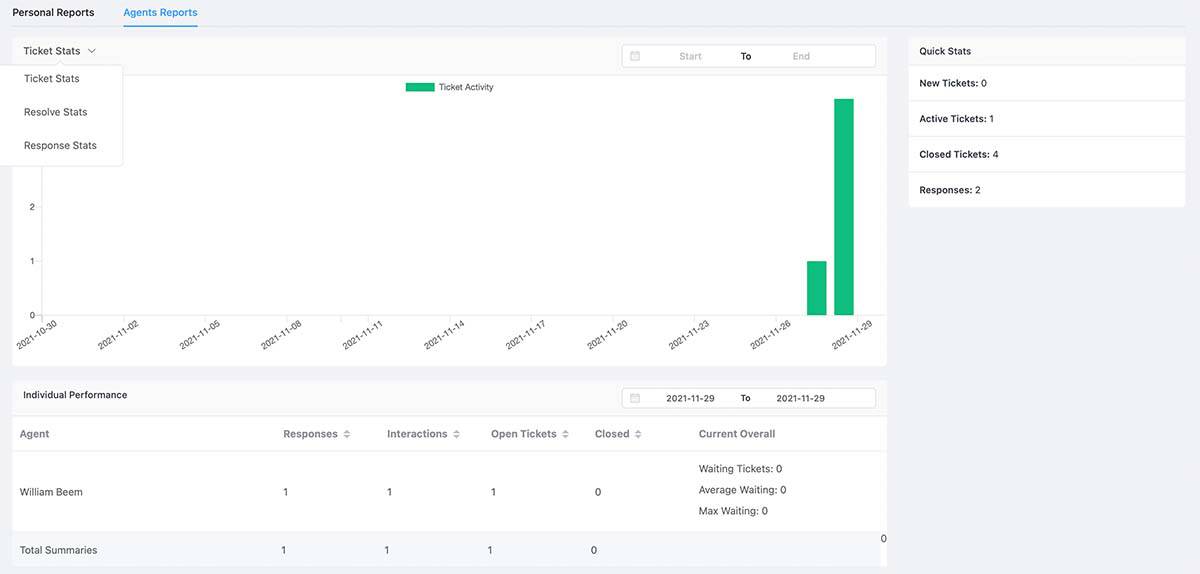
Reporting is one of the weak spots of Fluent Support, and this may be a bigger issue for some organizations than others. I’ve heard from the vendor that service level agreements and reporting are areas for future development, and that’s not surprising. Other products from the same vendor also had considerable development after the initial release.
For now, you can see Personal Reports that show an agent how he or she is doing. Agents Reports will show a collective report of all agents.
The dropdown menu on the upper-left corner offers three different types of reports to view:
The tickets have time stamps when there’s activity, as shown on the Activity menu within Fluent Support. I think there’s potential for better reporting, but it isn’t in Fluent Support as of this review.
Fluent Support Pricing (LIFETIME DEAL PRICES Until January 2022)
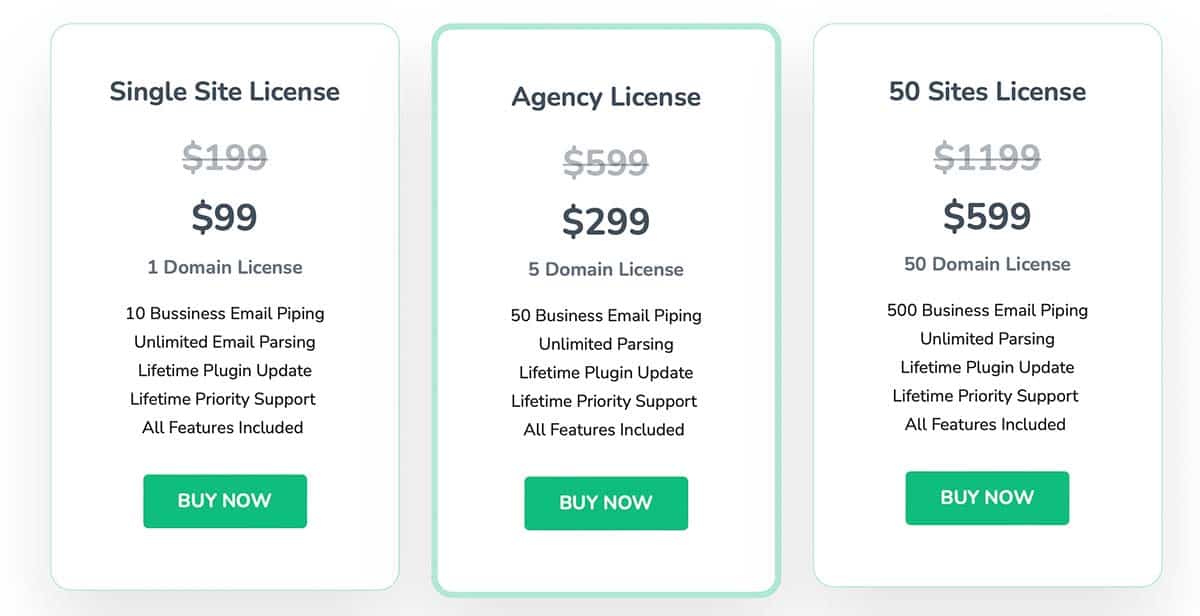
Fluent Support was released with LIFETIME DEAL pricing, as its sister applications have done in the past. This pricing is effective until December 10, 2021. The lifetime deal will still be active, but the prices will DOUBLE for the LTD.
As of January 1, 2022, the lifetime deal expires and Fluent Support will only be available for annual licensing. So it’s in your own interest to act soon, or pay more if you choose Fluent Support.
As you can see, there are three options for licenses with different numbers of domains. This is no additional cost. You receive all future updates for Fluent Support for one price if you act before the LIFETIME DEAL expires and the pricing model transitions to annual pricing.
Also, notice the prices crossed out. I suspect (but cannot confirm) that those prices will be the annual prices after the LIFETIME DEAL expires.
When you compare that to online services, like ZenDesk, you pay an annual fee per agent. The lowest plan for ZenDesk starts at $19/month per agent, and that’s a severely limited plan with many necessary features removed.
Would you rather pay $228/year for each agent using a crippled version of ZenDesk on a single site, or pay $99 once for unlimited agents with a tool that’s well tested and already receiving new updates weekly?
I’ve worked in IT for decades and used many different support ticket tools, as well as the time I spent building ticketing systems in Remedy for Lucent Technologies when I worked there.
Fluent Support is a great tool, and it offers more than it lacks. It’s what I use for my sites now, and I’m quite happy to recommend it. Please remember this is a WordPress plugin, so you must install it on a WordPress site to use it.
When it comes to providing excellent customer service, speed and efficiency are key. Fluent Support is the perfect WordPress plugin for supporting your customers.
With its fully functional support ticketing system, you can create automation to assign tickets based on specific criteria, integrate with chat and messaging services, and get detailed analytics of your support tickets.
Plus, with advanced features like collision detection, you can avoid issues with multiple agents working on the same task. Easily filter and search for tickets and integrate with FluentCRM or other services.
With Fluent Support, you can provide the fast and efficient customer service your clients deserve.
- Low cost of operation
- Multiple integrations
- Automated workflow
- Collision detection for multiple agents working same ticket
- Automatic assignment
- Portal and Email ticket entry
- Custom email notifications
- Performance reports per agent
- It only works in WordPress
- No mobile app
- No SLA support


