
Key finding: This FluentSupport review establishes that the per-seat agent tax is an unnecessary drain on business capital. By moving your support infrastructure to a self-hosted environment, you eliminate recurring monthly fees and reclaim total data sovereignty for 129 dollars per year. This architecture provides unlimited agent seats and a native connection to your customer database. It serves as the definitive solution for owners who require high-performance support without the structural fragility of third-party SaaS contracts.
Your helpdesk vendor charges rent for a problem you already own
Every month, HelpScout withdraws money from your business account, whether your support volume justifies it or not. Zendesk does the same. Freshdesk follows the same model. The subscription helpdesk industry built its entire revenue architecture on the assumption that you will never question the math.
That pricing model is not a subscription. It is what a separate analysis on this site calls a SaaS Hostage Crisis, and the exit cost is your entire support history.
You should question the math.
A business owner running a WooCommerce store, a course platform, a client-booking operation, or an agency does not have a support problem that requires a rented SaaS dashboard. You have a WordPress installation. You already own the server. You already own the database. You already own the customer relationship. The only thing a subscription helpdesk gives you that you do not already possess is a recurring invoice.
FluentSupport installs directly into WordPress and stores every ticket, every agent interaction, every workflow rule, and every customer record in your own database. You pay a flat annual license. You own the asset. This review examines whether the plugin delivers the technical architecture and operational depth to justify replacing HelpScout permanently.
The subscription helpdesk model transfers wealth from your business to theirs
HelpScout’s Plus plan runs $75 per month for ten users. That is $900 per year to access software you will never own, run on infrastructure you will never control, and store customer data in a location you cannot audit. If your team grows, the price climbs. If HelpScout raises its rates, you absorb the increase or migrate under pressure.
The ownership model works differently. FluentSupport charges a one-time annual license starting at $129 per site. The data lives in your WordPress database. The workflows run on your server. When you renew, you are paying for continued updates and support, not continued permission to access your own tickets.
The table below compares FluentSupport directly against HelpScout, Zendesk, and Freshdesk across the variables that matter to a business owner: data location, pricing structure, WordPress integration depth, and automation capability.
FluentSupport delivers the feature set HelpScout charges three times more to access
Feature parity with HelpScout is not the ceiling here. FluentSupport matches HelpScout on shared inbox management, collision detection, workflow automation, and reporting, then extends beyond it with native WordPress integrations that HelpScout cannot replicate without third-party middleware.
The comparison below runs through the core feature categories a support operation requires. Where FluentSupport holds an advantage, the architectural reason is specific: the plugin runs inside WordPress, which means it reads your WooCommerce orders, your FluentCRM contact records, your LearnDash enrollments, and your user data natively, without an API call to an external service.
| Criteria | HelpScout | Zendesk | FluentSupport |
|---|---|---|---|
| Best For | Small teams wanting a simple, email-style shared inbox. | Enterprise teams needing massive scale and complex AI. | Teams looking to stop per-agent billing and own their data. |
| Pricing Model | Per User/Month ($25–$75) | Per User/Month ($19–$219+) | Flat Annual Fee ($129/yr) for unlimited agents |
| Data Ownership | None: stored on HelpScout servers | None: stored on ZenDesk servers | Full: stored in your WordPress database |
| Learning Curve | Low. Very intuitive and easy to start | High. Complex setup often requiring an administrator | Moderate. Familiar for any WordPress user |
| SLA Management | Included in higher tiers only | Robust, multi-level policies | Real-time timers, breach alerts, and automated escalations |
| KPI Reporting | Standard metrics (FRT, resolution) | Deep analytics and custom dashboards | Heat maps, waiting time tracking, and agent performance |
| Ticket Collision | Standard on all plans | Standard on all plans | Built-in to prevent double-replies |
| CRM Connection | Remote API (Requires data syncing) | Remote API (Requires data syncing) | Instant local connection (No syncing required) |
| 12-Month Cost (5 Agents) | $3,000 | $3,300 | $129 |
| Workflow Automation | Rule-based automation on higher plans only; no business hours logic | Advanced automation and triggers; requires administrator configuration | Conditional workflows, auto-assignment, auto-response, business hours rules |
| WordPress Integration | Via Zapier or custom API only | Via Zapier or custom API only | Native: WooCommerce, FluentCRM, FluentCart, LearnDash, EDD, AffiliateWP |
FluentSupport is an enterprise-grade helpdesk engineered to eliminate per-seat pricing and keep your customer data within your own database. Built with a Vue.js administrative interface and a custom-table schema, it provides the responsiveness required for high-volume support operations without the latency of third-party API bridges. It integrates natively with the rest of your self-hosted infrastructure to provide a unified view of customer history, order status, and communication logs.
- You can add as many agents as you want without your monthly bill going up
- Custom database tables keep the system fast even when you have thousands of tickets
- Your customer data stays on your server where it belongs instead of a third-party silo
- Agents get an immediate view of purchase history and CRM data through local database queries
- The dashboard works like a fast web app so your team isn't waiting on page reloads
- You need a powerful enough server to handle the extra activity during peak times
- You have to connect your own email service to make sure messages are delivered reliably
FluentSupport uses a dedicated database schema so your site stays fast under load
Most WordPress support plugins store ticket data in the standard wp_posts and wp_postmeta tables. This is the path of least resistance for plugin developers. It is a structural liability for site owners. As ticket volume grows, those tables bloat. Every query your site executes against wp_posts now competes with ticket, order, post, and page data simultaneously. Query times climb. Admin panel latency increases. Your customers notice.
FluentSupport writes to its own dedicated database tables, completely separate from the core WordPress schema. The screenshot below shows the plugin’s custom table structure. Ticket data, agent data, workflow logs, conversation threads, and activity records each occupy purpose-built tables with their own indexes.
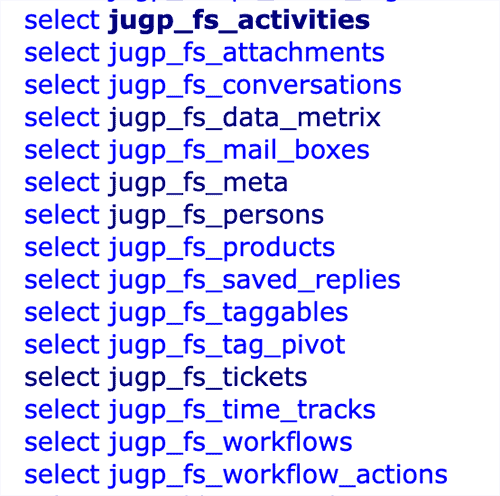
This architecture produces a measurable operational advantage. When an agent opens a ticket, the query targets a specific table with a specific index. It does not scan a shared table containing every post, page, and product on your site. The result is consistent inbox load times regardless of ticket volume, so your agents can spend their time resolving issues rather than waiting for the interface to respond.
The separation also simplifies database maintenance. A backup plugin can exclude FluentSupport tables during scheduled backups when storage is constrained, or target them specifically for a compliance export. A staging environment can clone just the ticket schema for testing workflow changes without duplicating your entire production database.
FluentSupport reads your existing WordPress data, so agents never ask customers to repeat themselves
The primary source of friction in modern business operations is the latency introduced by third-party API bridges. When you use a SaaS helpdesk, you must synchronize. The most destructive pattern in customer support is the agent who opens a ticket without context and asks the customer to explain their order number, account status, or purchase history. The customer already provided that information when they bought from you. Asking for it again signals that your systems do not communicate, and that signal erodes trust in the business.
FluentSupport pulls customer data from your FluentCRM environment directly into the ticket interface. When a WooCommerce or FluentCart customer submits a ticket, the agent can see the order history, order status, and product details alongside the conversation thread without opening a separate tab or querying a separate system. The same native data pipeline works with FluentCRM contact records, FluentCart orders, LearnDash course enrollments, and Easy Digital Downloads purchase history.
FluentSupport connects to WooCommerce, FluentCRM, FluentCart, LearnDash, EDD, and AffiliateWP natively. Your agents see the full customer record without leaving the ticket view.
This is not a webhook integration or a Zapier connection. The plugin reads the same database your store runs on. The data is current to the second the agent opens the ticket, with no sync delay and no API rate limit to exhaust.
Where FluentSupport stands today and what the 2025 release cycle added
Earlier coverage of FluentSupport identified three operational gaps: reporting depth, agent performance visibility, and business hours logic. The 2025 release cycle addressed all three. This section documents what changed and provides the evidence.
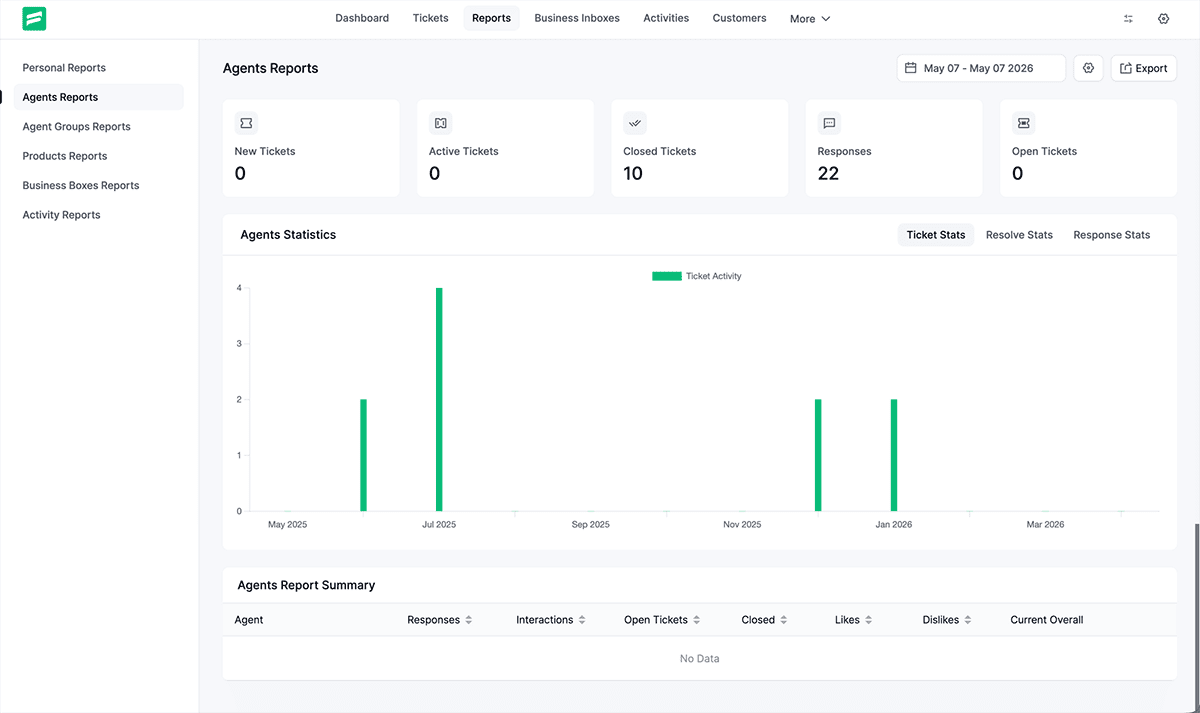
The reporting dashboard now surfaces first response time, average resolution time, ticket volume by channel, and agent-level performance metrics across a selectable date range. The screenshot below shows the reporting interface. These are the same metrics a HelpScout administrator would find in their analytics panel, running inside your WordPress dashboard at no additional cost.
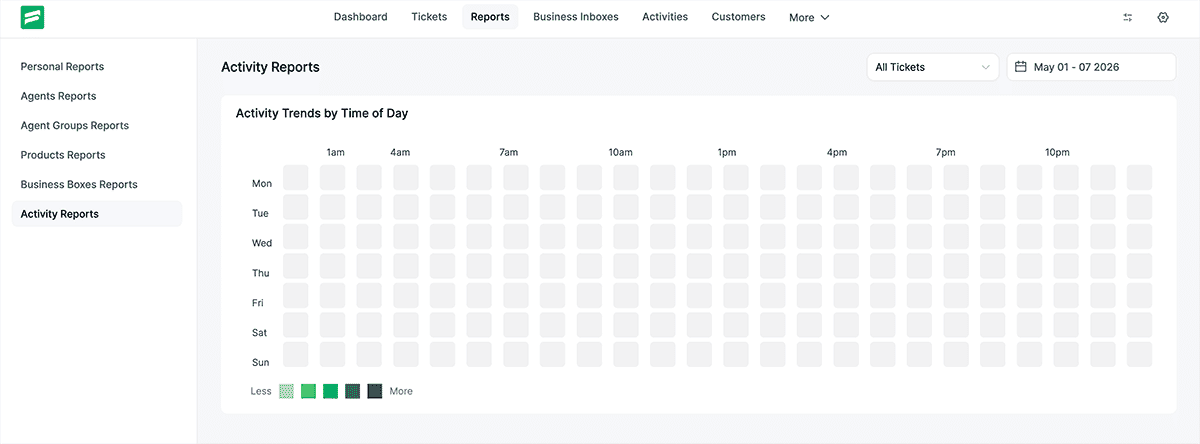
The reporting architecture now includes granular agent activity logs. This level of transparency is essential for maintaining the integrity of a distributed support team. By auditing response times and ticket resolution patterns locally, you eliminate the need for third-party tracking tools. The system provides a forensic view of how your human capital is being utilized, allowing you to optimize support workflows based on empirical evidence rather than anecdotal feedback.
Efficiency also requires a low-latency notification layer that operates outside the WordPress dashboard. My previous analysis noted the need for better external synchronization, which has been addressed by integrating Slack, Telegram, and Discord. These are not merely social features; they are critical infrastructure components that reduce the time-to-first-response. By pushing ticket alerts directly into your team’s existing communication stack, you ensure that urgent technical issues are identified and addressed before they escalate into systemic failures.
FluentSupport gives you complete data jurisdiction, which matters for GDPR and US state privacy law
When your helpdesk runs on HelpScout’s servers, your customer support data resides in a jurisdiction you do not control. HelpScout’s infrastructure is US-based. If your customers are in the EU, you are transferring personal data to a third country under GDPR Article 46. That transfer requires a legal mechanism: Standard Contractual Clauses, an adequacy decision, or binding corporate rules. Most small business owners running HelpScout have not implemented any of these. They are out of compliance and do not know it.
FluentSupport eliminates the transfer problem at the architectural level. The data never leaves your server. If your WordPress host operates a data center in Frankfurt, your support data stays in Frankfurt. If your host is in the United States and your customers are domestic, the data governance picture is straightforward. You control the location. You execute the backup. You respond to a Subject Access Request by querying your own database.
The contractual exposure disappears with it. You are no longer a Data Controller relying on a third-party Data Processor with its own privacy policy, its own breach notification timeline, and its own legal team interpreting its obligations. You are the controller and the processor. The liability consolidates under your existing hosting agreement.
Under GDPR, storing customer support data with a SaaS provider classifies that provider as a Data Processor. FluentSupport removes the third party entirely. Your WordPress host becomes the only infrastructure in the chain.
Architect’s Note: SaaS vendors advertise encryption in transit because it sounds rigorous and costs them nothing to offer. Encryption at rest is the harder question, and it is the one they avoid. When your support data lives on HelpScout’s infrastructure, you do not control the encryption of the underlying database volumes, the key management policy, or the audit trail that proves compliance to a regulator. When FluentSupport runs on your WordPress host, you do. Full-disk encryption, database-level security protocols, and industry-specific compliance configurations are decisions your infrastructure team makes, not concessions you negotiate with a vendor. That is not a feature. That is what data jurisdiction actually means.
Who FluentSupport Is Not For
Editorial credibility requires saying this plainly. FluentSupport is not the right solution for every business, and installing it in the wrong context will yield poor results.
If your support operation runs entirely outside WordPress, FluentSupport offers no advantage. The plugin’s native data integrations only activate within the WordPress ecosystem. A business running Shopify for commerce, HubSpot for CRM, and a custom application for user accounts will not see the WooCommerce order panel or the FluentCRM contact record in the ticket view, because those systems do not exist inside its WordPress database. A standalone SaaS helpdesk will better serve that architecture.
If your team exceeds fifty support agents operating across multiple brands with complex SLA tiers, role hierarchies, and enterprise reporting requirements, you are approaching the boundary of what a WordPress plugin is designed to manage. FluentSupport scales confidently to mid-sized operations. At enterprise scale, purpose-built platforms with dedicated infrastructure entail lower operational risk.
If you require a phone or live chat channel as the primary support surface, FluentSupport’s core competency is ticket-based support. It handles email, SMS, and front-end submission forms with depth and precision. Voice and live chat require third-party integrations that add complexity.
Outside those three situations, a WordPress business owner paying monthly for HelpScout, Zendesk, or Freshdesk is paying to rent infrastructure they do not need.
FluentSupport is purpose-built for WordPress. If your store, course platform, or client portal runs on WordPress, the plugin reads your existing data natively. That native integration is the architectural case for switching.
How to migrate your helpdesk from HelpScout, Zendesk, or Freshdesk to FluentSupport
FluentSupport supports direct migration imports from six platforms: HelpScout, Zendesk, Freshdesk, Support Candy, JS Helpdesk, and Awesome Support. The migration tool is located in the FluentSupport dashboard under the Importer menu. No third-party migration service is required, and no developer is needed for a standard import.
The process follows three steps. First, you export your ticket data from the source platform using that platform’s native export function. HelpScout exports to CSV from the Reports section. Zendesk exports are available in the Admin Center under Data Management. Freshdesk exports from the Admin panel under Helpdesk Productivity. Second, you upload the exported file to the FluentSupport importer, which automatically maps the source fields to FluentSupport’s schema. Third, you review the field mapping screen, confirm the import, and the plugin writes the historical ticket data to your WordPress database.
Agent accounts do not transfer automatically because each agent requires a WordPress user account. Create the WordPress users first, then assign them to FluentSupport agent roles before running the import. This ensures the importer can attribute historical tickets to the correct agent record.
Conversation attachments require a separate step on some platforms. HelpScout stores attachments on its own CDN. Before you close your HelpScout account, download the attachment archive from your account settings, then upload the files to your WordPress media library or to a designated folder on your server.
Do not cancel your HelpScout or Zendesk subscription until you have confirmed the import completed successfully and your agents can locate historical tickets in FluentSupport. Run both systems in parallel for a minimum of two weeks.
After the import, configure your support email address to route incoming messages to FluentSupport’s email piping system. This connects your existing support inbox to the plugin so new tickets generate automatically from incoming email without requiring customers to change the address they already use. The email piping configuration screen walks through the IMAP/SMTP credentials your host provides.
A business owner running a WooCommerce store with three to five years of HelpScout history can typically complete a full migration, including historical tickets, agent setup, workflow configuration, and email piping, in a single working day. The first month’s HelpScout invoice you do not pay covers a significant portion of the FluentSupport annual license.
FluentSupport earns the replacement of HelpScout for any WordPress business paying monthly
The case for FluentSupport is not philosophical. It is financial and architectural. A WordPress business owner paying $75 per month for HelpScout spends $900 per year to access a support system that stores their customer data on someone else’s server, charges more as their team grows, and delivers no native integration with the store or platform generating the support demand in the first place.
FluentSupport costs $129 for a single-site annual license. It installs in WordPress. It reads your WooCommerce or FluentCart orders, your FluentCRM contacts, and your course enrollments without middleware. It writes ticket data to a dedicated database schema without degrading your site’s query performance. It keeps your customer data under your data governance policy, not HelpScout’s.
The 2025 release cycle closed the reporting and SLA gaps identified by earlier versions of this review. The feature set is now complete for any support operation running between one and thirty agents. The workflow automation engine handles routing, escalation, auto-response, and business hours logic without requiring a developer to configure it.
If you run a WooCommerce store, a FluentCart operation, an agency, a course platform, or any client-facing business built on WordPress, FluentSupport is the correct helpdesk infrastructure. The migration path is documented. The import tool handles the six most common source platforms. The first month, you do not pay, and HelpScout partially funds the annual license.
The only reason to stay on HelpScout after reading this review is if your operation falls into one of the three disqualifying situations described above. If it does not, the financial argument resolves itself.
The compounding cost of keeping HelpScout runs past the license fee
The subscription fee is the visible cost. The invisible cost is agent time lost to context switching. An agent using HelpScout to support a WooCommerce store opens HelpScout in one tab, WooCommerce in a second tab, and whatever CRM or email platform the business uses in a third. Every ticket that requires order verification produces a tab switch, a search, a copy-and-paste, and a return. At fifteen tickets per agent per day, across a three-agent team, that switching overhead accumulates into hours per week.
FluentSupport eliminates the tab switch because the order record, the contact record, and the ticket thread exist in the same interface. The agent reads the ticket, sees the order history in the right panel, and responds with full context in a single view. The time recovered per ticket is small. The time recovered across a support operation running five days a week computes into a material productivity gain by the end of the first quarter.
The license cost comparison reinforces the arithmetic. A three-agent HelpScout Plus plan runs $225 per month. FluentSupport's Agency plan, covering unlimited agents on multiple sites, costs less annually than three months of that HelpScout subscription. The delta does not go to HelpScout. It stays in the business.
| Period | HelpScout (5 Agents) | Zendesk (5 Agents) | FluentSupport (Unlimited Agents) |
|---|---|---|---|
| Year 1 | $3,000 | $3,300 | $129 |
| Year 2 | $6,000 | $6,600 | $258 |
| Year 3 | $9,000 | $9,900 | $387 |
| Total 3-Year Liability | $9,000 | $9,900 | $387 |
FluentSupport Review: Answers to the Questions Buyers Ask Before Switching
What is FluentSupport and how does it work?
FluentSupport is a WordPress helpdesk plugin developed by WP Manage Ninja. It installs directly into WordPress and converts your site into a fully functional customer support system. Customers submit tickets through a front-end portal or by emailing your support address. Agents manage, reply to, and resolve those tickets from inside the WordPress dashboard. All ticket data stores in your WordPress database, which means you own the data and it never transfers to a third-party server.
Is FluentSupport a legitimate HelpScout alternative for WordPress businesses?
Yes. FluentSupport replicates the core functionality of HelpScout, including shared inbox management, agent assignment, collision detection, workflow automation, and performance reporting, at a fraction of the annual cost. It exceeds HelpScout specifically for WordPress businesses because it natively reads WooCommerce orders, FluentCRM contacts, and other WordPress plugin data within the ticket view. HelpScout requires Zapier or a custom API work to achieve the same context.
How does FluentSupport handle GDPR compliance?
FluentSupport stores all customer support data in your WordPress database on your hosting server. No customer data transfers to FluentSupport’s servers or any third-party infrastructure. This means you function as both the Data Controller and the effective Data Processor under GDPR, eliminating the third-party processor relationship that SaaS helpdesks create. You control data location, retention, deletion, and Subject Access Request responses directly through your WordPress installation and hosting environment.
Can I migrate existing tickets from HelpScout or Zendesk to FluentSupport?
Yes. FluentSupport includes a built-in migration importer that supports HelpScout, Zendesk, Freshdesk, Support Candy, JS Helpdesk, and Awesome Support. You export ticket data from your current platform using that platform’s native export tool, then upload the file to the FluentSupport importer, which automatically maps the fields. Agent accounts require manual setup as WordPress users before running the import. Most migrations for small to mid-sized support operations complete within a single working day.
What types of WordPress businesses benefit most from FluentSupport?
FluentSupport delivers the strongest return for WordPress businesses that generate support demand directly from their WordPress ecosystem: WooCommerce and FluentCart store owners, digital product sellers using Easy Digital Downloads, course creators on LearnDash or LifterLMS, agencies managing client portals, and service businesses booking clients through WordPress. Any business in these categories that currently pays a monthly SaaS helpdesk subscription will recover the cost of FluentSupport’s annual license within the first two to three months of switching.
